How to Set Up a Gumroad Store and Make Your First Sale
Set Up a Gumroad Store in Under an Hour and Start Selling Today
Most digital product sellers spend two weeks building a Shopify store before they find out nobody wants what they are selling. Gumroad solves that problem. You can set up a Gumroad store, upload your first product, and share a live checkout link in under an hour — all before spending a cent on a website, domain, or design tool.
Gumroad is a no-code e-commerce platform built specifically for creators selling digital products. No inventory, no shipping, no monthly subscription fee to pay before your first sale. The platform handles payment processing, file delivery, global sales tax, and basic email marketing automatically. Your job is to show up with a product and a buyer.
This article walks through every step: creating your account, setting up your profile the right way, uploading your first product, understanding what Gumroad actually charges, connecting your payout method, optimizing your product page to convert, driving your first traffic from Instagram, Threads, and Pinterest, and knowing when it is time to outgrow the platform. If you are building a faceless digital product business and need a fast, reliable storefront, this is where to start.
What Gumroad Is and Why Beginners Start Here
Gumroad is a direct-to-buyer storefront. When someone purchases from your Gumroad store, they pay through Gumroad’s checkout, receive their file automatically, and the money goes to your connected payout account. You are not involved in any individual transaction once your product is live.
The platform supports digital downloads (PDFs, ebooks, Canva template links, Notion templates, audio files, zip files), online courses, memberships, and subscriptions. Most beginners start with a single digital download and expand from there.
What makes Gumroad the right starting point is speed and simplicity. There is no monthly fee, no technical knowledge required, and no approval process. You can go from zero to a live product page in the same afternoon you decide to start. The expert advice for beginners is consistently the same: validate your product idea on Gumroad before investing time and money in a custom website. Once you consistently clear $1,000 per month, you have proof of demand worth building around — and then the conversation about platforms with lower fees makes more sense.
Gumroad also has a built-in discovery marketplace called Discover, where buyers browse and find products by category. This gives new sellers a second traffic channel alongside whatever external promotion they run. The trade-off on Discover is significant and worth understanding before you list — covered in detail in the fees section below.
Step 1: Create Your Gumroad Account
Go to gumroad.com and click “Start Selling.”
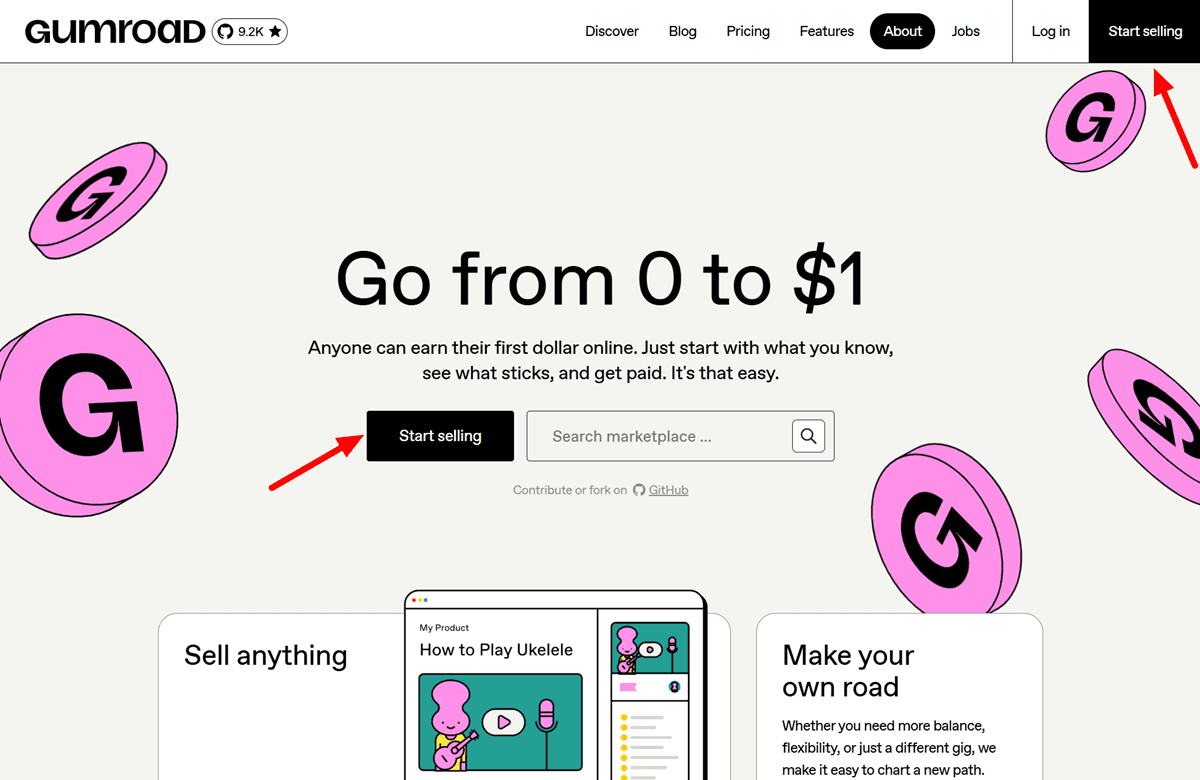
You can sign up with Google, X (formerly Twitter), or an email address. Email signup is the simplest for most people.
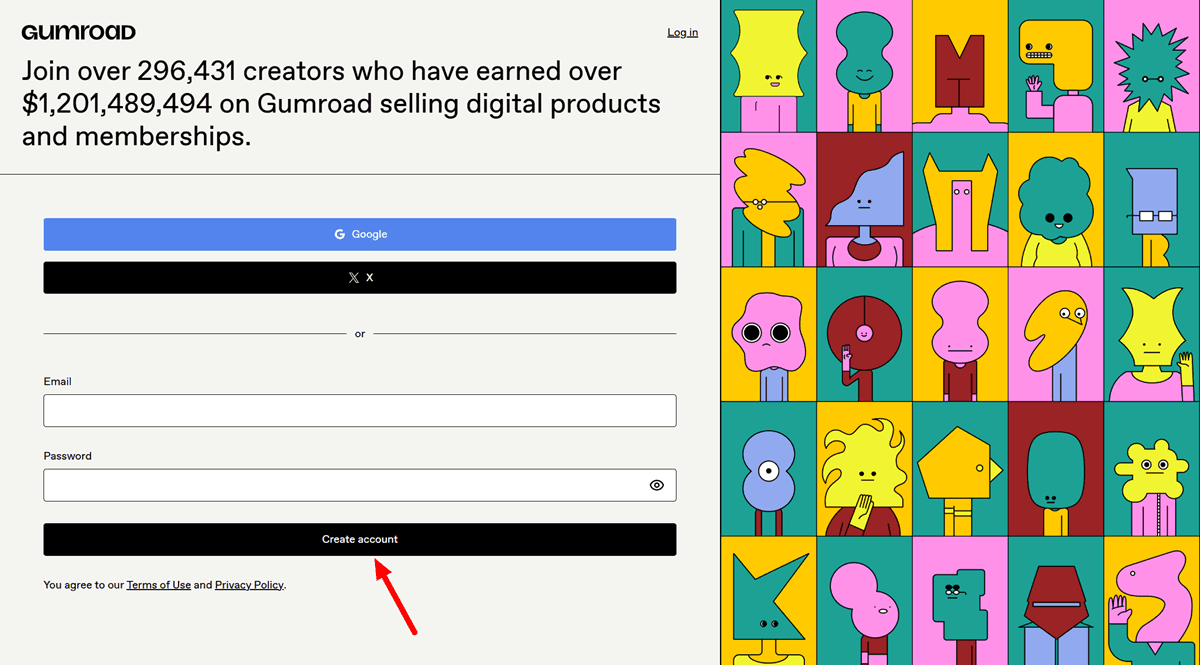
After confirming your email, you land on your creator dashboard.
The dashboard is clean and minimal. The left sidebar gives you access to Products, Analytics, Customers, Emails, Workflows, Payouts, and Settings. You will use all of these, but not on day one.
The first thing to do before touching anything else: claim your custom profile URL. Under Settings, you can set your store URL to something like yourname.gumroad.com or yourstore.gumroad.com.

The default URL is a random string of characters that looks unprofessional and is difficult to share. A clean, memorable URL makes every future link you share — in an Instagram bio, a Threads post, a Pinterest pin description, an email — look credible. Do this on day one before you share your store anywhere.
Step 2: Set Up Your Creator Profile
Your Gumroad profile is your storefront. Most beginners treat this as an afterthought and pay for it with lower conversion rates.
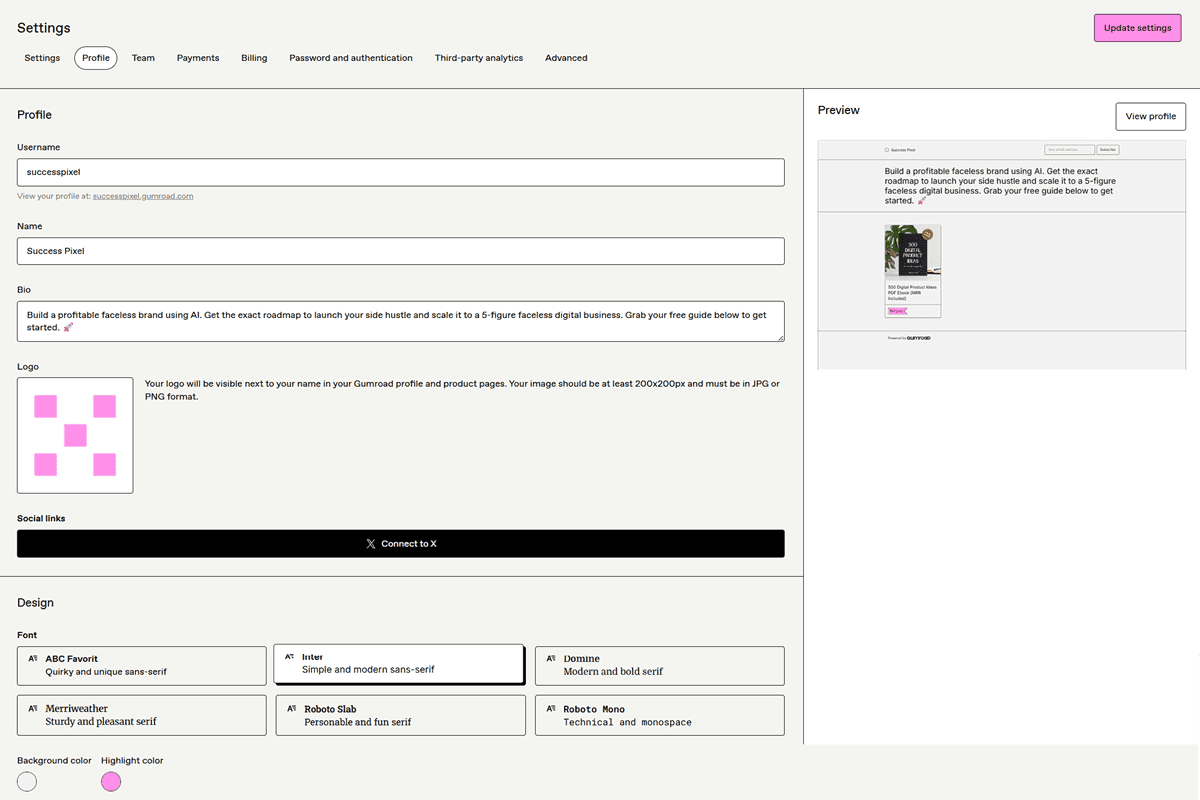
Go to Settings, then Profile. Fill in:
- Display name: Your brand name or store name. This is what buyers see, not your email address.
- Bio: One to two sentences that describe exactly what you create and who it is for. “I help freelance designers save time with ready-to-use Canva templates for client projects” converts better than “I make cool templates.” Specificity tells the buyer they are in the right place.
- Profile photo or logo: A consistent brand image rather than a personal photo. For faceless businesses, a simple logo or your brand’s primary color on a clean background works well and looks professional.
- Store appearance: Under Settings, you can customize your font, background color, and highlight color. Gumroad does not support banner image uploads. Use your color choices deliberately — pick a background and highlight color that match your brand palette so the storefront feels intentional rather than default.
The visual consistency between your Gumroad profile colors, your product cover images, and your Instagram or Threads account is what builds brand trust without needing a personal identity. Same palette, same fonts, same tone everywhere.
Step 3: Connect Your Payout Method
Before listing a single product, connect your payment method so you can actually receive money.
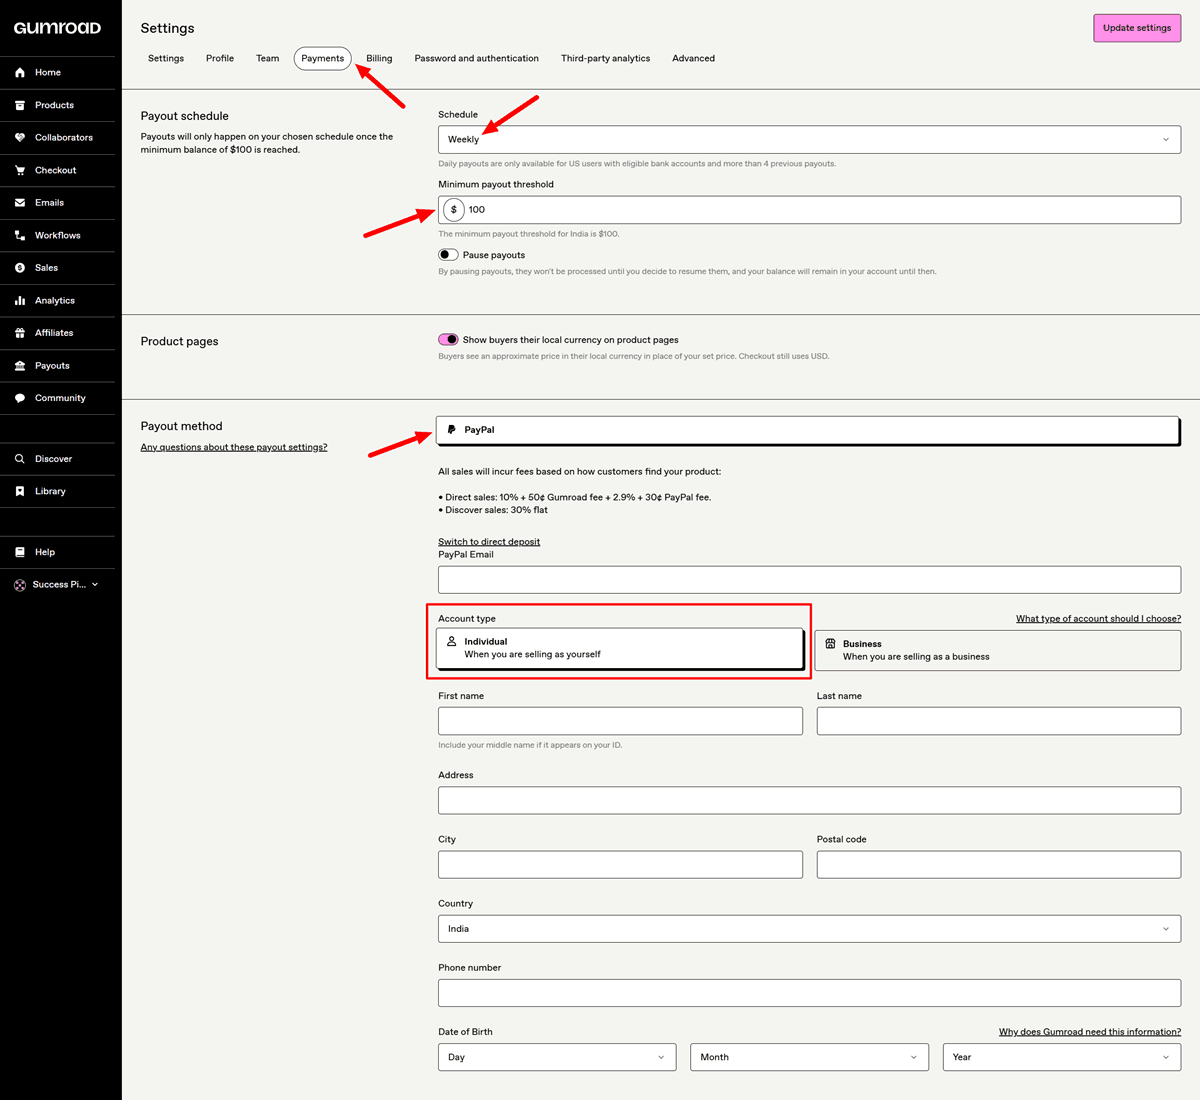
Go to Settings, then Payments. Gumroad pays out via Stripe (for US and most international sellers) or PayPal (where Stripe is not available). You will also need to submit basic tax information — a W-9 if you are in the United States, or the equivalent for your country.
Gumroad pays out every Friday by default. There is a $100 minimum payout threshold, meaning your balance needs to reach $100 before a payout is triggered. If you make your first $40 sale on a Monday, it will sit in your Gumroad balance until the following Friday after your balance reaches the $100 threshold, or until Gumroad releases it during the standard weekly cycle. For beginners making smaller early sales, this can feel slow. It is normal.
Set your payout schedule in Settings and verify that your banking or PayPal information is correct before your first sale, not after. Sorting out payment details after your first sale arrives creates unnecessary anxiety.
Step 4: Understand Gumroad’s Fee Structure Before You Price Anything
This is the section most beginner guides skip. Understanding the fees before you set your prices is essential, because the numbers affect what you actually take home.
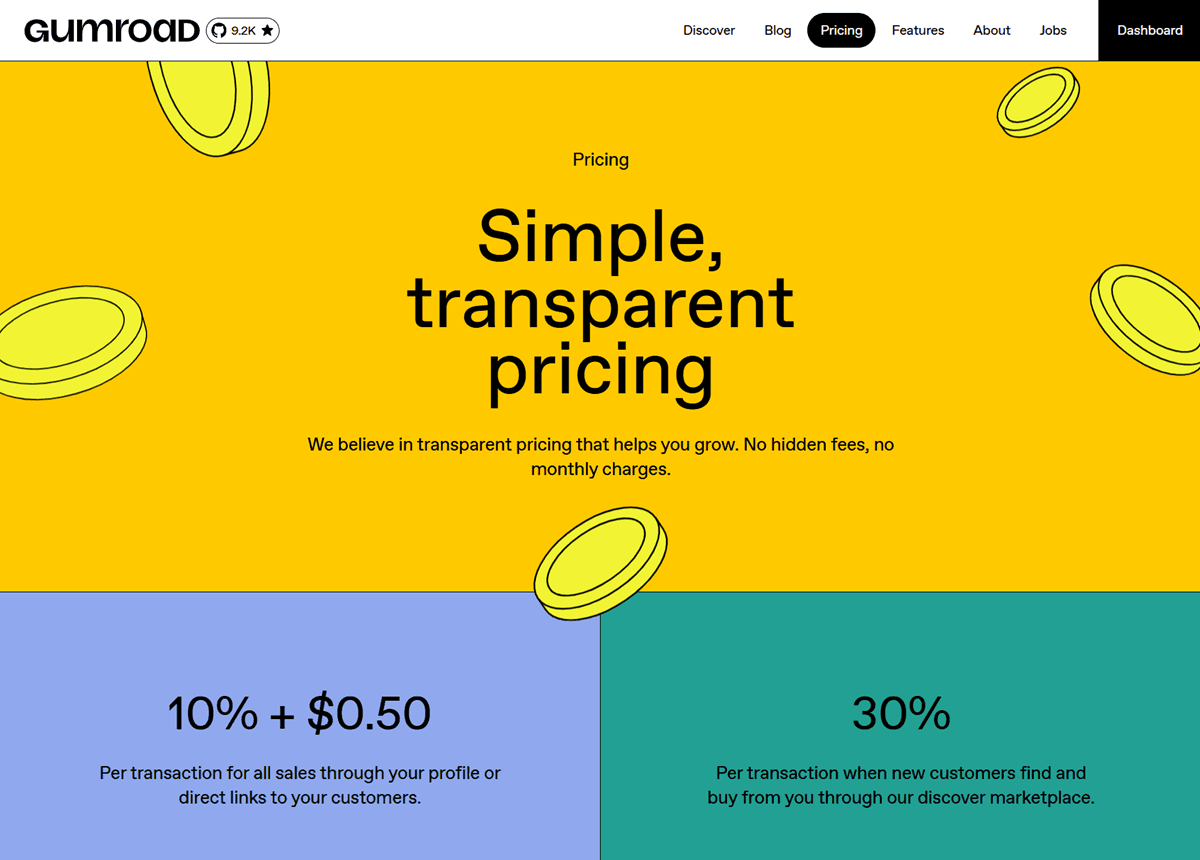
Direct sales (when buyers come from your own links): Gumroad charges 10% of the sale price plus $0.50 per transaction, as the verified June 2026 fee structure from Gumroad’s own pricing page confirms. Credit card processing through Stripe adds another 2.9% plus $0.30 on top of that. On a $27 product sold via a direct link to a buyer who pays by card, your effective take-home is approximately $22.80 after fees.
Discover marketplace sales: When a buyer finds your product through Gumroad’s own Discover marketplace, the fee shifts to a flat 30% of the sale price, with processing included. On that same $27 product, Gumroad keeps $8.10, and you keep $18.90. The difference between a direct sale and a Discover sale on the same product is roughly $4 per transaction.
The critical detail most guides miss: The 30% Discover rate applies even if you send your own traffic to a product that is listed in the Discover feed. If your product is publicly visible on Discover and a buyer arrives through Discover — even following a link you shared on Instagram — Gumroad applies the 30% rate. This catches many sellers off guard. You have limited control over which sales get tagged as Discover versus direct.
The fixed $0.50 fee on low-priced products: The $0.50 flat fee per transaction hurts most on cheap products. A $3 product loses about 27% to fees. A $10 product loses about 18%. This is why experienced sellers price digital products at $9 minimum and aim for $17 to $47 for ebooks, templates, and guides. The math gets friendlier as the price rises.
What Gumroad handles for you: Since January 2025, Gumroad has acted as the full Merchant of Record on every sale, meaning they calculate, collect, and remit global sales tax, VAT, and GST on your behalf in applicable jurisdictions. You do not need to register for VAT in 20 countries or figure out European tax law. That compliance coverage is the main justification for the 10% fee, and for most beginners, it is genuinely worth it.
Refund fees: Gumroad does not refund fees when you issue a refund to a customer. If you sell a $100 product and issue a full refund, you lose approximately $13.70 in non-refundable fees. This is worth knowing before you set your refund policy.
Step 5: Upload Your First Product
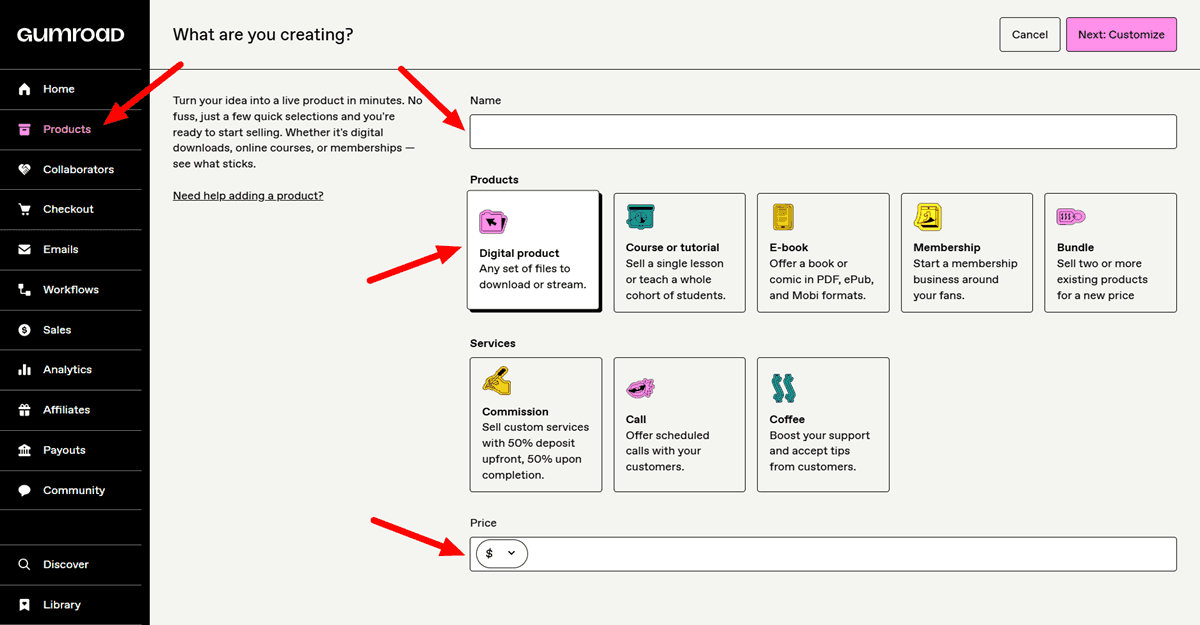
Click Products in the left sidebar, then New Product. Choose “Digital Product” for downloads (ebooks, PDFs, Canva template links, Notion templates, audio, zip files), or “Course” if you are selling structured educational content.
Name Your Product
The product name is the first thing buyers see. Write it like what a buyer searches for, not like a designer describes it. “30 Canva Instagram Templates for Coaches” is better than “Social Media Pack Vol 1.” Specificity signals relevance.
Set Your Price
Enter your price in the price field. Add a “+” after the number (e.g., “17+”) to enable Gumroad’s Pay What You Want pricing, which lets buyers pay more than your minimum if they choose to. Sellers consistently report that Pay What You Want buyers often pay 30 to 60% above the minimum, which raises average revenue per transaction with no extra effort.
For a free lead magnet designed to build your email list, enter “0” as the price. Every buyer who downloads a free product can be added to your email list through Gumroad’s built-in workflow tools.
Write Your Product Description
The description is your sales page. Most beginners write a paragraph about what the product is. What converts is explaining what the buyer gets, who it is for, and what problem it solves — in that order.
A practical structure: open with the outcome the buyer gets. Follow with what is included. End with who it is specifically for. Avoid vague language like “high-quality” or “comprehensive” — those words appear on every listing and mean nothing to buyers.
Add a Cover Image
Your cover image is what appears on your product page and in the Discover marketplace. It is the most important visual element in your listing and the primary driver of whether a buyer clicks to learn more. A strong cover image shows the product in context — a template displayed on a phone screen, a planner shown open on a desk, an ebook cover that looks professional. A generic plain background with text converts significantly worse than a styled mockup image.
Create your cover image in Canva. Use your brand colors and fonts for visual consistency. The recommended size is 1280 x 720 pixels, landscape orientation.
Add a Thumbnail
Your thumbnail is the image that appears across your Gumroad Library, Discover marketplace, and Profile pages. It is the first visual a potential buyer sees when browsing, which makes it one of the most important elements of your entire listing.
Gumroad requires your thumbnail to be square, with a minimum size of 600 x 600 pixels. Accepted file formats are JPG, PNG, and GIF. A larger image within those proportions will always look sharper across devices, so aim for at least 1000 x 1000 pixels when possible.
Avoid plain text-on-background images. A styled mockup — a template displayed on a phone screen, a planner shown open on a desk, or a professional ebook cover — converts significantly better than a generic design. Create your thumbnail in Canva using your brand colors and fonts. Keep any text minimal. The image should communicate the value of your product at a glance, not explain it.
Product Info
The product info section is where you establish what your product is and who it is for. Your product name functions as a headline, so treat it like one. Include the primary keyword your buyer would search for and make it specific and outcome-focused. A name like “30 Canva Instagram Reels Templates for Coaches” tells a buyer exactly what they are getting. A name like “Template Pack” tells them almost nothing.
Your description is the main body of your listing. Use it to cover what the product includes, who it is designed for, and the result the buyer can expect after using it. Short paragraphs and simple formatting work better than dense blocks of text. Write to a buyer who is skimming, not reading word for word.
Call to Action
The call to action controls the text that appears on your main buy button. Gumroad gives you three options: “I want this!”, “Buy this”, and “Pay.” This is a small setting with a measurable impact on how buyers feel about clicking.
“I want this!” tends to perform best for digital products because it feels lower commitment than “Buy.” It matches the impulse-driven nature of browsing a digital marketplace and reduces the psychological friction of making a purchase decision. Unless your product has a reason to use a more transactional label, this is the recommended default.
Summary
The summary is a short one-to-two sentence pitch that appears below your product name on the listing page. Think of it as a tagline that connects your product name to the longer description below.
Lead with the buyer’s outcome or the single biggest benefit your product delivers. A summary like “30 done-for-you Canva Reels templates so you can post every day without touching a design tool from scratch” is more compelling than “A pack of Instagram templates.” The goal is to make a skimming buyer slow down and read more.
Additional Details
The additional details section lets you add bullet-style callouts that highlight the most important features of your product. These appear prominently on your listing and help buyers make a faster decision by surfacing the information they need without requiring them to read the full description.
Focus each detail on something that removes doubt or raises perceived value. File formats, total quantity, compatibility requirements, time savings, and included bonuses all work well here. Each callout should answer an unspoken question your buyer is likely holding. Examples include notes like “Fully editable in Canva Free,” “Includes 30 templates across 3 color palettes,” or “Lifetime access with all future updates included.”
Integrations
The integrations section lets you invite buyers into a community after they complete their purchase. Gumroad currently supports three options: a built-in Gumroad community chat, a Circle community, and a Discord server.
The Gumroad community chat is the simplest option and works well for product support or general buyer communication without requiring buyers to create an account on an external platform. A Discord server gives you more control and is better suited for high-engagement communities where buyers interact with each other or where you deliver ongoing updates and coaching. Circle is the most structured option and fits a course-style or membership experience best.
For digital product sellers, adding a community integration meaningfully increases the perceived value of a product and reduces refund requests by giving buyers a place to get help. Even a simple Discord server tied to your product can be the difference between a buyer who feels supported and one who asks for a refund.
Pricing
The pricing section is where you set how much your product costs and how buyers can pay for it. Gumroad supports a wide range of currencies, including USD, GBP, EUR, INR, AUD, CAD, and several others, with the currency selector appearing directly next to the price field.
Beyond a fixed price, you have three additional options. The “pay what you want” setting lets you define a minimum price while allowing buyers to pay more if they choose. This works well for templates, resources, or products where a portion of your audience may want to contribute more than the listed amount. The installments option splits the total price into multiple payments, which can increase conversion on higher-priced bundles or courses by reducing the upfront commitment. The auto-apply discount code option automatically applies a saved discount at checkout, which is useful for launch promotions or affiliate-specific pricing where you want the reduced price baked directly into a referral link.
Versions
The versions feature lets you offer multiple variations of the same product within a single listing, each with its own price, file set, and description. Rather than creating separate listings for closely related products, you can use versions to upsell buyers directly on the listing page.
Common version setups include tiering by feature level, such as a Starter version with core templates and a Pro version that adds a commercial license or bonus assets. You can also tier by format, for example, offering a PDF-only version alongside a version that includes the editable Canva file. When set up well, versions increase your average order value without requiring buyers to visit a separate page or listing.
Settings
The settings section contains several configuration options that control how your listing behaves. Most are optional, but a few are worth setting intentionally rather than leaving at their defaults.
Limit product sales:
Limiting product sales lets you cap the total number of units sold, which is useful for creating scarcity around a limited-run bundle or cohort-based product. The customer quantity option allows buyers to purchase more than one unit at checkout, which is helpful if your product is likely to be bought in multiples, such as a license pack for a team.
Publicly show the number of sales on your product page:
The public sales count toggle displays your total sales on the listing page. This is a strong social proof signal, but it works best once you have meaningful volume behind it. For a new listing, leave it off until you have at least 50 sales showing.
Mark the product as an e-publication for VAT purposes:
If you are selling an ebook or written publication to buyers in the European Union, mark the product as an e-publication for VAT purposes. Gumroad handles VAT collection automatically once this is enabled.
Specify a refund policy for this product:
Your refund policy communicates the level of buyer protection you offer. Options range from no refunds to a 6-month money-back guarantee. A 30-day refund policy tends to strike the right balance for digital products. It increases buyer confidence and reduces hesitation without meaningfully increasing actual refund rates.
I’d strongly advise against offering refunds for digital products unless you have carefully written terms and conditions that clearly define eligibility. Once a customer gains full access to a downloadable product, the transaction is effectively irreversible. Fraudulent buyers can purchase your product, download or copy everything, request a refund, then walk away with both the content and their money. In more serious cases, they may even duplicate your work, launch a competing version, or misuse your intellectual property, creating unnecessary financial losses, legal challenges, and ongoing headaches for your business.
The fine print field is an optional space for licensing terms, usage restrictions, or legal disclaimers. Use it for notes like “For personal use only — not for resale” or any terms that do not belong in the main description but need to be visible before purchase.
Require shipping information:
Finally, the require shipping information toggle collects a physical address at checkout. Only enable this if your product includes a physical component. For purely digital products, leave it off.
Upload Your File
Drag and drop your file into the Content tab. Gumroad accepts PDFs, images, audio, video, zip archives, and most standard file formats. It hosts and delivers the file automatically after every purchase. No third-party file storage needed.
If you are selling a Canva template, upload a PDF that contains your Canva template link and clear instructions for accessing it. Do not upload a downloaded Canva file — buyers cannot open or edit those correctly.
For PDF products, use Gumroad’s Stamping feature (available in the product settings). Stamping adds the buyer’s email address to every page of the PDF, which discourages unauthorized sharing and protects your product from piracy without requiring a watermark that degrades the design quality.
Publish Your Product
Hit “Publish” in the top right corner. Your product is now live. Copy the product link. This is the URL you will share on Instagram, Threads, Pinterest, and everywhere else. The direct product link bypasses the Discover fee — buyers who click your link and purchase through it are direct sales, not Discover sales.
Step 6: Organize Your Store With Sections
This is the step that most beginner guides skip entirely — and it is the reason many Gumroad profiles look like a random collection of files rather than a real store.
Go to your profile page and click “Edit Profile.” Under the profile section, you can create named sections and add products to them. Sections work like categories. A Gumroad store with sections called “Instagram Templates,” “Lead Magnet Templates,” and “Free Downloads” looks like a curated shop. A store with 6 products dumped in a default order with no labels looks like a digital junk drawer.
Products that are not assigned to a visible section on your profile do not show up in your Gumroad storefront, even if they are published. This catches new sellers off guard — they publish a product, and it vanishes from their profile page. Always add new products to a section after publishing.
Sections also help buyers navigate directly to what they need, which reduces bounce rates and increases the chance of multiple purchases in a single session.
Step 7: Set Up Your Email Workflows
Gumroad includes basic email marketing through a feature called Workflows. This is not a replacement for Beehiiv or Kit, but it handles the essential post-purchase sequence without requiring a third-party tool.
Set up at minimum 2 automated emails:
Welcome email (sent immediately on purchase): Thank the buyer, confirm their download, and remind them where to find the product. Include one sentence about what else you sell. Keep this email short — 3 to 4 sentences.
Follow-up email (sent 3 to 5 days after purchase): Ask if they have used the product. Share a tip related to it. Mention one other product they might find useful. This email turns a one-time buyer into a returning customer, which is the most cost-effective way to grow revenue without acquiring new traffic.
In Gumroad, go to Workflows from the left sidebar. Set up a trigger-based sequence attached to each product.
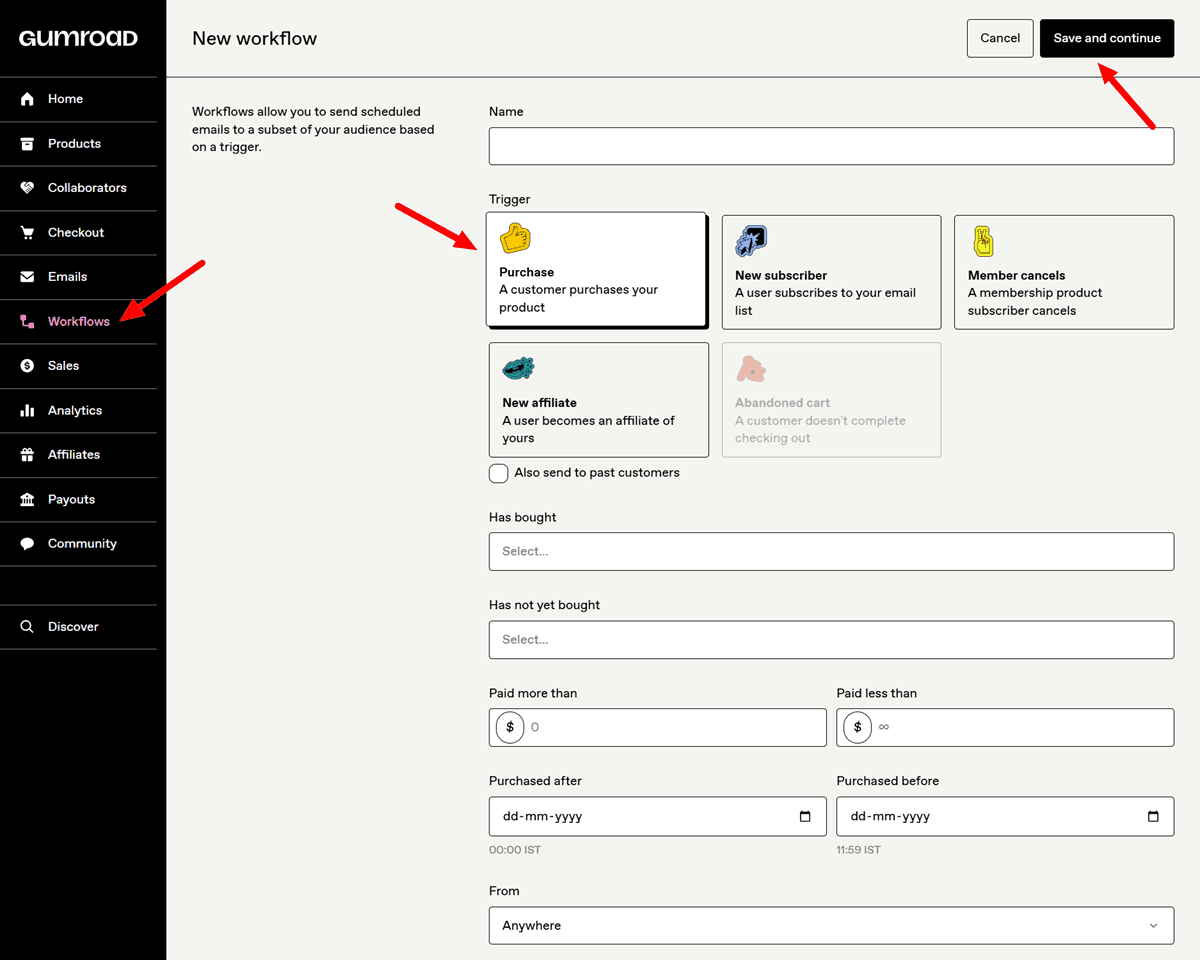
You can also send broadcast emails to your full buyer list when you launch new products — treating every past buyer as a warm lead for everything you publish next.
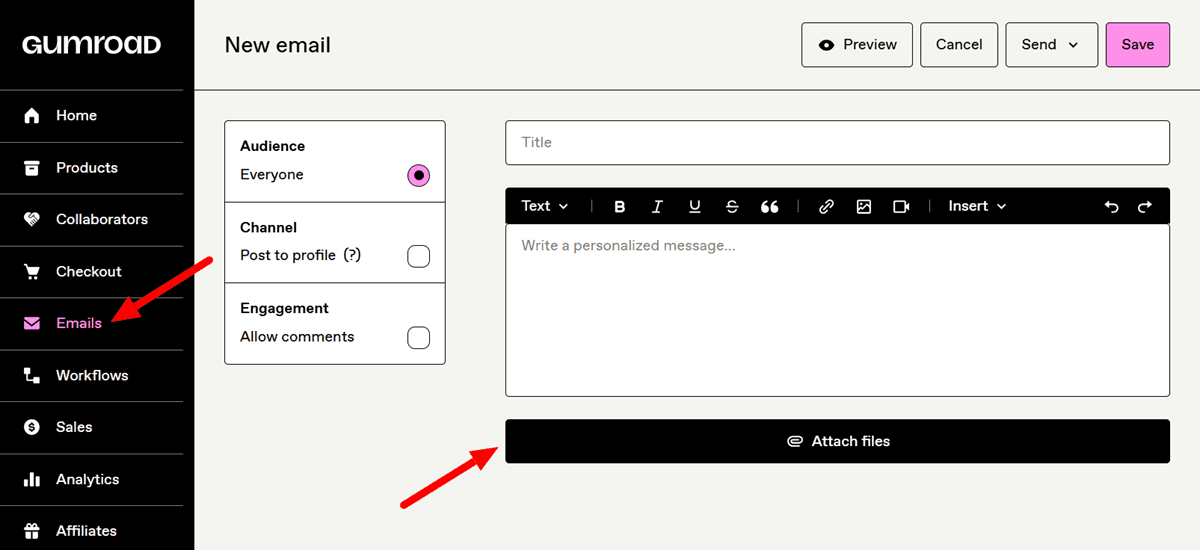
This email list is the most valuable asset your Gumroad store builds over time. Etsy and other marketplaces keep customer data inside the platform. Gumroad gives you direct access to every buyer’s email address. That difference compounds as your catalog grows.
Step 8: Set Up Your Affiliate Program
Gumroad has a built-in affiliate program that allows other creators to promote your products in exchange for a commission you set. Go to your product page settings and enable Affiliates. Set a commission rate — 20 to 40% is standard for digital products.
Once enabled, affiliates get their own unique referral link to your product. Every sale through that link pays them the commission automatically. You only pay when they generate a sale.
This is one of the most scalable traffic strategies for a faceless digital product business. Faceless Instagram accounts and Threads creators in your niche become your marketing team without you building their audience yourself. For a $27 product at 30% commission, you pay $8.10 per sale and keep $18.90 minus Gumroad’s fee — still a better return than paid advertising at equivalent volumes.
The practical step: once your product is live and has at least a few buyer reviews, reach out to 5 to 10 accounts in your niche on Instagram or Threads. Offer them affiliate access. Many small-to-medium accounts welcome the arrangement.
How to Drive Traffic to Your Gumroad Store
A live Gumroad store with no traffic makes zero sales. Here is the traffic stack that works for faceless sellers at the beginning.
A faceless Instagram account in your product niche is the most direct traffic driver to a Gumroad store for most digital product sellers. The bio link points to your Gumroad profile or a specific product page. Posts, carousels, mockup images, screen-recording reels, drive followers to that link.
The posting format that converts best for Gumroad traffic: show the product being used. A screen recording of someone filling in a Canva template, a before-and-after post showing the problem your ebook solves, a carousel of tips from your guide with a “get the full version at the link in bio” end slide. These posts answer the buyer’s main question — “will this actually help me?” — before they ever click the link.
Threads
Threads reaches new readers algorithmically, meaning a well-written post can reach thousands of people who do not yet follow your account. For Gumroad sellers, Threads works best for text-heavy product niches: ebooks, guides, email templates, and prompt libraries. Post 3 to 5 short, useful tips in your niche daily. Include your Gumroad link in your bio. Every few posts, mention your product directly in context — not as an ad, but as the natural next step for someone who wants to go deeper.
Threads and Instagram are connected through Meta’s infrastructure. Your Instagram followers can find your Threads account automatically, giving a new Threads profile a head start if you already have an Instagram presence.
Pinterest pins linking to your Gumroad product pages or your Gumroad profile generate search-indexed traffic for 12 to 24 months from a single pin. Create vertical pins (1000 x 1500 pixels) showing your product in a styled context, with keyword-rich titles and descriptions that match how buyers search. A library of 50 to 100 pins across relevant boards builds compounding traffic without any daily effort.
Pinterest works exceptionally well for visual digital products — Canva templates, printables, planner PDFs — because buyers actively search for exactly those products on the platform. For every product you list on Gumroad, create at least 5 Pinterest pins and distribute them across relevant boards over 2 to 3 weeks.
Your Email List
The buyers who have already purchased from your Gumroad store are your warmest possible leads. When you launch a new product, send an announcement to your existing buyer list first. Even a list of 50 to 100 past buyers will generate more day-one sales than cold social media traffic, because they already know your quality.
Every free product you offer on Gumroad, including a template sampler, a one-page checklist, and a short guide, is a lead magnet that grows this list. Set the price to $0 in Gumroad, promote it on Instagram and Threads, and every person who downloads it joins your email list. That list compounds in value with every new subscriber.
What Gumroad’s Analytics Tell You (and What to Do With Them)
Go to the Analytics tab in your Gumroad dashboard. You will see total revenue, sales volume by product, traffic sources, and conversion rates by product page.
The conversion rate metric is the most actionable number on this dashboard. If your product page is getting visits but not converting, the problem is one of four things: the cover image is not compelling, the description is not specific enough, the price is misaligned with perceived value, or the wrong traffic is arriving (buyers who are not your target audience).
A product page with a 1 to 2% conversion rate is normal for cold traffic. A page converting at 4% or above with consistent traffic is a winner worth promoting more heavily.
Traffic source data tells you which platforms are actually sending buyers versus which ones are sending browsers. If Pinterest is sending 40 traffic visits per week and Instagram is sending 200, but Pinterest converts at 3% while Instagram converts at 0.5%, your time is better spent creating more Pinterest pins.
Use this data to inform where you spend your promotion time, not just how many followers or views you accumulate.
Common Gumroad Setup Mistakes That Cost Sales
Sellers who set up Gumroad and then wonder why no one is buying are almost always making one of these mistakes.
1. Not adding products to a visible section
Published products that are not assigned to a profile section do not appear on your storefront. This is a documented Gumroad behavior that catches every new seller. Check your profile view after publishing to confirm the product is visible.
2. Using the default random profile URL
A URL like gumroad.com/d/38jf92 looks like a phishing link to cautious buyers. Claim a clean custom URL in Settings before sharing your store anywhere.
3. Writing descriptions that describe instead of sell
“This is a 30-page ebook about social media” is a description. “Stop wasting hours on content that gets no engagement — this 30-page guide gives you the exact posting framework that brings followers to your paid products” is a sales page. Write for the outcome, not the spec.
4. Pricing under $9
The $0.50 fixed fee per transaction makes sub-$9 products disproportionately expensive to sell. A $7 product nets roughly $5.30 after Gumroad and card processing fees. A $17 product nets roughly $13.80. Price for margin, not for accessibility.
5. Relying entirely on Gumroad Discover for traffic
The Discover marketplace charges 30% per sale. Building your own traffic from Instagram, Threads, Pinterest, or an email list means every sale goes through the 10% direct rate instead. That difference adds up fast at any meaningful volume.
6. Ignoring the email follow-up sequence
The single highest-return action you can take after your first 10 sales is setting up a 2-email post-purchase workflow. A buyer who used your product and heard from you once is 3 to 5 times more likely to buy your next product than a cold visitor. That sequence runs automatically and costs you 30 minutes to set up.
When to Stay on Gumroad (and When to Move On)
Gumroad is the right platform for the $0 to $1,000/month revenue phase. The zero upfront cost, speed of setup, automatic tax compliance, and built-in email tools make it the best starting point for digital product sellers at any experience level.
Once you are consistently above $1,000/month, the 10% flat fee becomes a meaningful cost. At $3,500/month in revenue, Payhip’s Pro plan at $99/month with 0% transaction fees saves you hundreds of dollars per month compared to Gumroad’s 10% rate. Lemon Squeezy offers strong tax compliance and lower fees for software and SaaS products. Shopify gives you full brand control at a fixed monthly cost with no per-transaction percentage.
The smart move: start on Gumroad, validate your product and traffic strategy, build your email list, and migrate to a lower-fee platform once the math supports it. Do not build a custom Shopify store before you know anyone will buy what you are selling.
That validation phase is what Gumroad is built for — and it does it better than any other platform at zero upfront cost.
FAQ
Q: How long does it take to set up a Gumroad store from scratch?
A: A basic Gumroad store — account created, profile filled out, one product uploaded and published, payout connected — takes 30 to 60 minutes for most first-time sellers. The time increases if you need to create a product cover image or write the product description from scratch. The technical setup itself is among the fastest of any digital product platform.
Q: Does Gumroad charge a monthly fee?
A: There is no monthly subscription fee on Gumroad. The platform charges 10% plus $0.50 per direct sale, with credit card processing fees of approximately 2.9% plus $0.30 added on top. Sales made through the Gumroad Discover marketplace are charged at a flat 30%, which includes processing. If you sell nothing, you pay nothing.
Q: How do I connect PayPal or a bank account to Gumroad?
A: Go to Settings, then Payments in your Gumroad dashboard. From there, you can connect Stripe (for bank/card payouts) or PayPal, depending on your country. US sellers will also need to submit a W-9 form for tax compliance before payouts can be processed. Gumroad pays out every Friday by default, with a $100 minimum balance threshold.
Q: What is the Gumroad Discover marketplace, and should I use it?
A: Gumroad Discover is the platform’s built-in search and recommendation system, where buyers browse products by category without arriving from your own links. It provides a second traffic channel for new sellers with no existing audience. The trade-off is a 30% fee on any sale that comes through Discover versus 10% on direct sales. Products listed publicly on Gumroad are included in Discover automatically. The fee applies even if you sent the buyer to your product through your own link, but they arrived via a Discover session.
Q: How do I make my first sale on Gumroad fast?
A: The fastest path to a first sale is to post about your product once on Instagram or Threads with your Gumroad link in your bio, offer a free version of the product as a lead magnet to generate downloads and social proof, and share the direct product link in any existing community or group where your target buyer hangs out. Do not wait for Discover traffic — it takes time and pays a 30% fee. Your own promotional post is both faster and more profitable.
Q: Can I sell Canva templates on Gumroad?
A: Yes. Canva templates are one of the most popular product types on Gumroad. You deliver them by uploading a PDF that contains your Canva template link — a shareable URL that gives each buyer their own editable copy of your design without altering your master file. Never upload a downloaded Canva file directly, as buyers cannot open or edit those correctly.
Q: Does Gumroad handle sales tax and VAT automatically?
A: Since January 2025, Gumroad acts as the Merchant of Record on every transaction. That means Gumroad calculates, collects, and remits sales tax, VAT, and GST on your behalf in applicable countries worldwide. You do not need to register for VAT in individual countries. You are still responsible for income taxes on the payouts you receive, but Gumroad eliminates the international tax compliance burden that would otherwise fall on you.
Q: When should I move from Gumroad to another platform?
A: Gumroad is the right choice for revenue ranging from $0 up to roughly $1,000/month. Once you consistently exceed $1,000/month, the 10% flat fee becomes significant compared with platforms that charge fixed monthly fees and lower per-transaction rates. At $3,500/month, Payhip Pro at $99/month with 0% transaction fees is materially cheaper than Gumroad. At higher volumes, platforms such as Shopify, Lemon Squeezy, or WooCommerce become worth the setup investment. The signal to move: when your monthly Gumroad fees exceed the monthly cost of a better platform.
Your store is live — the next step is filling it. Learn how to build a Canva template product your buyers will actually pay for, and how to use your Gumroad store as the foundation for a full faceless digital product business.