How to Get Google AdSense Approval: Google AdSense Tutorial
If you are searching for How to get Google AdSense Approval on the first attempt or Adsense approval tricks, or similar, you have landed on the right page.
After watching other bloggers’ success stories and paychecks, many people start a blog to make money online.
It’s not a bad idea to start a blog. However, you might know how many of them continue after 1-2 years and earn a significant amount of money to make a living.
A very few!
Isn’t it right?
What might be the reason behind it?
Think…
When a newbie tries to create a blog and make money online, Google AdSense is one of the obvious platforms he wants to get in.
But Google AdSense is the most popular and trusted ad network, and getting AdSense approval takes a lot of work.
Due to fraudulent activities like self-clicking or group-clicking, Google has now changed its advertisement business policies to protect the advertisers’ money and its business.
It doesn’t necessarily mean all genuine publishers have got affected. No.
If you are one of those bloggers who want to get AdSense approval without any spammy techniques and generate revenue in the long term, then this article will definitely help you.
This is a 5000+ word blog post, so grab a cup of copy and start reading this post.
My Blogging Journey With AdSense
Before sharing the tips and tricks to get AdSense approval fast, let me share my own story.
You’ll like it.
I started my first blog four years back as a complete newbie. Although I started as a hobby, I eventually learned that I could make money from my blog.
So I started writing content more frequently. Some were copy-pasted, while some were tiny articles of around 300-400 words with random images downloaded from Google.
Initially, I applied Amazon affiliate a.k.a. Amazon Associate program, and got approved in a couple of days.
But I needed more traffic and clicks on my affiliate URL, and I made only one affiliate sale during the first three months.
At that time, I did not know about SEO, content marketing, and the right monetization techniques because there needed to be someone to guide me.
The blog traffic was around 30-50/day through social media and other sources like Quora and Word of Mouth.
And, then I found Google AdSense as a solid money-making method. I was not getting enough from Amazon affiliates so switching to AdSense was obvious, as an average person could do.
I added a couple of more articles; not completely unique but just like curated content around the web and some of the magazines.
I was using Blogger (a.k.a. Blogspot) blog so applying for Google AdSense was relatively easy.
But when I received an email from the AdSense team that “Your Application is rejected.” I felt very sad because I thought I’d surely get AdSense approval on the first attempt.
Still, I didn’t give up and re-applied almost 4-5 times. But as usual, I didn’t get approved for Google AdSense.
Then I realized that I was doing something wrong. So I started searching for how to get Google AdSense approval and make money.
I watched YouTube videos, read some blog articles, and implemented the tips I had learned in those months.
Finally, I got approved in Google AdSense as a publisher and earned my first dollar.
Do you want to know the exact strategies I used to get Google AdSense approval in less than two months?
Read this article until the end, and it can prove a game-changer for your blogging journey.
Currently, I don’t use AdSense aggressively as my monetization strategy and primarily focus on Affiliate Marketing and Selling my services.
Still, the tips mentioned in this article are 100% working and effective.
Many people use illegal tricks to get Google AdSense approval and have multiple accounts that they sell to other people for a few dollars.
However, it’s completely wrong and against the AdSense Program policies. Google has invested millions in advanced technologies and sophisticated algorithms to detect all fraudulent activities.
So it’s always better to be on the safer side.
Otherwise, you may end up losing your money as well as an account too.
Types of Google AdSense Accounts
There are two types of Google AdSense accounts;
1. Hosted Google AdSense Account
If you are applying an AdSense ad platform via Google’s property including Blogger or YouTube, then this account is called a Hosted AdSense account where the revenue share is relatively less as compared to the Non-hosted AdSense accounts.
Creating a blog with Blogger and monetizing it may be an excellent option for some people who have a limited budget.
However, Google can shut your account anytime if you violate its policies.
Plus, the earnings potential gets compromised because people may not think of the free blog as a reputed one.
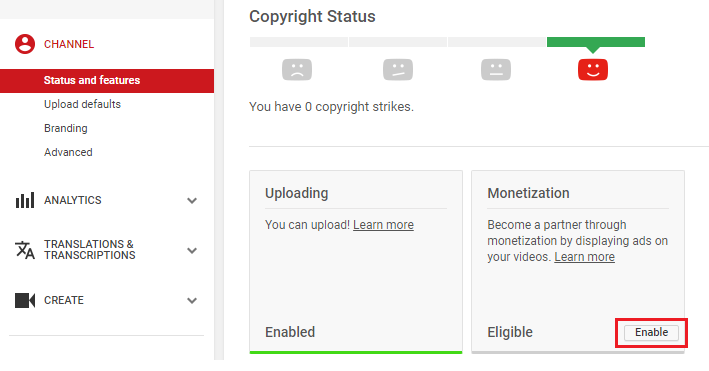
Remember, you can apply for the Hosted AdSense account using the YouTube channel too.
However, after recent changes in monetization policies of the YouTube Partner Program, you’ll need a minimum of 4000 hours of watch time during the previous 12 months and 1000 subscribers to enable this option.
Plus, shooting and editing high-quality videos is not everyone’s cup of tea.
Pro tip: Use Camtasia to record and edit high-quality videos if you are planning How-to and tutorial videos.
If you want to opt for this route, you can check your monetization status at Creator Studio >> Channel >> Monetization and enable it after fulfilling all the requirements of the YouTube Partner Program.
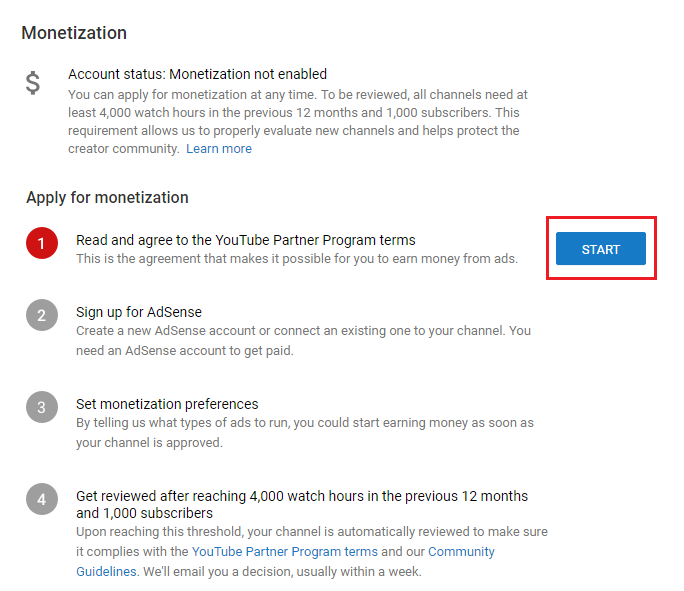
Enabling Google AdSense Monetization For YouTube
- Read and Accept YouTube Partner terms and conditions.
- Sign up for a new Adsense account or connect to the existing one if you have already.
- Set monetization preferences.
- Get your channel reviewed after reaching 1,000 active subscribers and 4,000 hours of watch time in the period of the previous 12 months.
2. Non-hosted Google AdSense Account
When you apply for Google AdSense with self-hosted web properties like a self-hosted WordPress blog, the account is called a Non-hosted AdSense account.
This account gives you more revenue share compared to the Hosted AdSense account.
You can choose any of the above options. However, non-hosted AdSense accounts have their perks.
That’s why I am going to use a custom domain and self-hosted blog to get Google AdSense approval.
Let’s start step-by-step.
How to Get Google AdSense Approval
Are you planning to build a Google AdSense website or blog?
Wait!
I have something great for you, which will help you get Google AdSense approval on the very first attempt and make good revenue with Google ads.
Follow this step-by-step Google AdSense tutorial for beginners to get quick AdSense approval for your WordPress site.
1. Niche Selection for AdSense Website
If you are not just thinking to get Google AdSense approval but also planning to make a full-time income, you should be careful while choosing the niche for your site.
Maybe a few of you have already picked up a niche and built a site around it. Still, this tip will help you a lot.
Here are the three most profitable niches.
- Health
- Wealth
- Relationship
Break down the above niches into sub-niches; you can get multiple topics to write about.
Still, I’m adding here the list of profitable niches for Google AdSense.
- Fitness
- Food
- Weight Gain
- Weight Loss
- Finance
- Marketing
- Real Estate
- Sales
- Technology
- Travel
- Beauty
- Dating
- Fashion
- Hobbies
- Sex (Not Porn though it’s highly profitable if you utilize other revenue methods)
- Spirituality
You can see, all of the above sub-niches fall under the main categories of Health, Wealth, and Relationship.
Why?
Because human beings mostly lack one of the above things and don’t hesitate to spend money to regain that in their life.
Important: You could even break down the above niches into micro-niches to reduce competition, but at the same time, you might need to compromise on the traffic potential of your blog.
I suggest you pick a niche that you are passionate about or at least write some super amazing content regularly.
However, don’t forget to check its earning potential before creating a website.
How to do that?
Just head over to Google and type a keyword related to your niche. If you find AdWords ads, you are on the right track.
To check the traffic potential of your niche, go to Google Trends, and check how it’s performing throughout the last few years and continues to be.
You can also use some market research tools which I’ll discuss in the next step.
2. Keyword Research
Whether you want to get Google AdSense approval or make money using other monetization methods, including Affiliate marketing, Sponsored ads, keyword research is the most crucial part of the blogging business.
Since you’re focusing on AdSense, you need low-competition keywords with high traffic and good CPCs.
It’s not so easy to find profitable keywords and rank them, especially when you are working in competitive niches.
However, you can combine the results from some free as well as premium keyword research tools and create a list of profitable keywords.
While doing keyword research make sure you are spying on competitors to find out other keywords they are targeting and make a list of all of them with required metrics like Search volume, CPC, SEO difficulty as well as PPC competition too.
Semrush is an amazing tool that will help you in the competitor’s analysis.
You can get a 14-day free trial using the following link.
Here are a few other keyword research tools you can use:
1. Google AdWords Keyword Planner
GAKP is the best free tool to find keywords for your AdSense website. Just enter a seed keyword or a URL of your competitor and get all relevant keywords with their metrics.
You can also target country, and language, and filter your searches according to your preference.
2. KWFinder
It’s a freemium keyword research tool from Mangools which provides a complete SEO suite at an unbelievably low price.
KWFinder works similarly to Google Keyword Planner but has an advanced dashboard and tells the SEO difficulty of each keyword and trends over the previous 12 months.
It offers up to 5 free keyword lookups daily which is sufficient for a newbie, but if you want to go beyond this limit and search more keywords, then you can use the following link for a discounted price.
Plus, it’ll give you other SEO tools like SERPChecker (SERP Analysis), LinkMiner (Backlink Analysis), and SERPWatcher (Rank Tracking) to enhance your results.
3. Semrush
When it comes to the competitors’ analysis, I love this tool the most.
It’s just amazing.
SEMrush is a premium SEO suite to perform various actions, including Site Audit, PPC Research, Backlink Analysis, and KW research.
Put any keyword or URL in its search box and see the magic.
If you are using it properly, it may give a tremendous ROI on your blogging efforts.
Organic research and competitor analysis are a couple of features you should definitely try if you’re doing keyword research for your AdSense website.
In the pricing section, Semrush is quite expensive, especially for the newbies, but you can get the free trial for 14 days and decide whether it’s worth investing money in or not.
4. Other KW Research Tools
- Ubersuggest (Free)
- Surfer (Free- Chrome Extension)
- LongTailPro (Premium)
- SerpStat (Premium)
- PPC Ad Copies (Free- Mentioned in the #1 Step)
3. Domain Selection
A domain is your online brand or identity. So choose it very carefully.
It doesn’t really matter what’s your domain name as long as you are following a few simple rules.
1. Get a custom domain, preferably with .COM, .NET, or .ORG TLD extensions. Avoid using subdomains for the sake of saving a few bucks. Creating an AdSense website with subdomains or web 2.0 may give you less revenue in the long term.
However, it’s entirely up to you what you want from your efforts.
#2. Be short and unique. The lengthy domain names of more than 15 characters are often hard to remember.
Plus, avoid using numbers and special characters like hyphens, which could potentially be the reasons for the typos, and you’ll lose some traffic if the user types a miss-spelled version of your domain.
#3. Sometimes, using expired domains for a website is a great option to get an initial SEO boost but make sure it does not have any penalties or Bad Links.
Pro tip: If you find a good expired domain with a DA/PA of more than 40, then you can earn from the sponsored posts or guest posts apart from the Google advertising revenue once you start getting enough traffic that satisfies the advertisers.
I purchase my high-value domains from NameSilo because it offers a lifetime free Whois Privacy, No annoying upsells, or No renewal upcharges. GoDaddy, BigRock, and Namecheap are other options for domain registration.
If you want to go with NameSilo, use coupon SAVEMY1BUCK to get a $1 discount on your initial purchase.
4. Purchasing Web Hosting
As I said earlier, you can host your site with free platforms like Blogger, but in the long term, a self-hosted website will prove the best option for you.
Plus, you’ll get complete control and flexibility.
That’s why try to purchase web hosting to host your AdSense site.
There are many web hosting companies around the web, and you may get confused about which one to choose.
I have used many web hostings for my blogs as well as for my clients, but I found Hostinger as the best web hosting around the web.
It offers enough space, unmetered bandwidth, and free SSL to take care of your website security.
And, customer support is one of the top-class in the industry. I strongly suggest going with SiteGround if you’re a beginner and don’t have any technical skills.
Plus, you can get a massive 70% off on your initial purchase so make sure you have purchased a plan for at least a couple of years to save big.
5. Replacing Nameservers
Once you have purchased the domain and hosting, you’ll get emails from both NameSilo and SiteGround containing the details of your recent purchase and other essential credentials.
The first step is changing the nameservers in your NameSilo account. You can perform this activity by signing in to your NameSilo account and replacing the default nameservers with the custom ones provided by SiteGround.
Important: If you have purchased the domain and hosting from other sources, you can use a similar method. In case, you don’t get how to do that, please refer to the documentation or ask the support staff to help you.
Sometimes, purchasing a domain + web hosting from the same company does not require changing nameservers.
6. Installing SSL Certificate on Your Domain
The next step is installing an SSL certificate for your domain. As SiteGround offers free Let’s Encrypt SSL, you can enable it in just a couple of clicks.
Log in to your SiteGround cPanel and select “Let’s Encrypt” under the “Security” Menu to activate the SSL certificate.
7. WordPress Setup for AdSense Website
After completing the above step, you can create your AdSense website. I prefer using WordPress because it’s one of the most popular CMS and is supported by an active community of millions of developers and contributors.
To install WordPress on your hosting, log in to your hosting cPanel, and use the Softaculous app installer to install WordPress.
You can also find a standalone app of WordPress present in the cPanel dashboard.
Now, choose the protocol and domain name (in case you have multiple domains or subdomains) to install WordPress. Leave the directory field empty.
In the next step, choose your preferred Site Settings and Admin Account Details.
Select the Language for your WordPress install or keep English (Default) as it is. You can also tweak the advanced setting, which is completely optional.
And, at the bottom, Select Install to get your AdSense website ready powered by WordPress.
8. Tweaking Some Basic Settings
After installing you can get the WordPress admin dashboard URL where you can log in with the username and password, you set up in the previous step.
Once you logged in to your WP admin panel, you should be doing the following changes.
#1. Delete the Hello Dolly Plugin (World’s most useless WordPress plugin. Lol)
#2. Remove the default comment.
#3. Delete the sample post/page if any installed by default.
#4. Set the Permalinks Setting by Post name. Go to WP admin panel >> Settings >> Permalinks >> Common Settings >> Choose option “Post name.”
9. Installing WordPress Theme
By default, your website will have the pre-installed theme (Layers, if you choose SiteGround), you can continue with this theme.
However, I’d suggest you go with a mobile responsive, super fast, and SEO-optimized theme which is specially designed for boosting your site’s engagement and ultimately the revenue from Google Advertising.
There are plenty of free as well as premium themes for the AdSense website available in the market.
MyThemeShop AdSense is one of the best AdSense themes I have ever used. It has a built-in Ad-blocker Detector which asks your visitors to turn off their ad-blocking software by restricting access to the site content.
If you are going to write amazing content, then MTS AdSense is a must-have theme for you.
Once you purchase this theme, simply download it (.zip file) and upload it to your site. After the upload gets completed (100%), Activate the theme.
You can also connect to MyThemeShop using the MTS updater to get automatic updates for your theme.
You can customize your theme to look even better. Don’t forget to add a Logo and Favicon, which is the brand identity of your website.
10. Installing Essential WordPress Plugins
Plugins enhance the performance of your site and add more functions as needed.
Here is the list of the most essential WordPress plugins you should be adding to your AdSense website.
- Forget Spam Comments – Antispam (Free).
- Rank Math – SEO and Readability Improvement (Free)
- WP Rocket – Caching (Free)
- All In One WP Security – WordPress Security (Free)
- Easy Table of Contents – Table of Content (Free)
- OneSignal Push Notifications – Browser Push Notifications (Free)
You need not install a social sharing plugin because MTS AdSense has beautiful built-in social sharing options.
Pro Tip: Take time to learn how each of these plugins works, and you can utilize it in the best way.
11. Creating Important Pages
A Contact Us Page
When you create an AdSense website and start posting content on it, you may get diverse reactions from all users.
And, if they want to share their feedback or suggestion, there would not be a better option than a dedicated Contact Us page.
Obviously, they can use a comment box but for private communication and service-related questions like sponsorship and guest posting approval, the contact us page serves a better purpose.
So it’s time to add it to your website. If you are using the MTS AdSense theme, you can use the pre-made contact us template for quick integration.
Adding your custom email address and phone number will increase the credibility of your blog in the eyes of users as well as Google.
If you have live social handles like the Facebook fan page or Twitter handle for your website, you can add them too.
When the Google AdSense team will be reviewing your application, they understand you are providing authentic content and actually care for your readers, and not just AdSense revenue.
You can refer to my Contact Us page too.
A Privacy Policy Page
Not having a privacy policy for your website is a common mistake many new bloggers make.
And, most importantly, it could be the main reason why you are not getting Google AdSense approval.
Google wants a Privacy Policy page on your AdSense website because it tells users what they should do and don’t while browsing your site or how you are going to treat their submitted information and on-page activities.
Plus, it gives the sense that you are serious about your business and have a professional mindset.
I’m sure more than 95% of cases users may not browsing this page, but there is nothing wrong with having it on your website.
Obviously, you can write it on your own by getting an idea from other bloggers or use Online Privacy Policy generators (You don’t need a lawyer) but make sure you are not copying someone else as it is.
An About Us Page
Similar to the Privacy Policy page, you must have an About Page on your website so that your reader can get there is a real person behind the blog.
Plus, it also helps you build credibility and improve your personal branding.
An About Us page tells people who you are and the real purpose of your blog. You can tell your blogging story to impress your readers and build a relationship with them.
This page alone plays a significant role in getting Google AdSense approval. And, I think you should be creative while crafting this page.
12. Adding Menus to Your Website
Once you created all essential pages, add them to Menus.
Just head over to WP Admin Panel >> Appearance >> Menus and Create New Menu.
You can either select the pages or add their links to Menu. Make sure you have added these menus in the Header area and are clearly visible.
Apart from that, you can enable Breadcrumbs.
MTS AdSense users can simple do that by going through WP Admin Panel >> Appearance >> Theme Options >> Single Post (Left Side of Theme Options Panel) >> Breadcrumbs and Enable.
Enabling the Breadcrumbs is a great way to make your site user-friendly and easy to navigate.
Remember, you can add Categories and Footer Menus to enhance your site navigation to the next level.
13. Adding Content to Your Website
Now, your website is ready to publish. And, you should only add high-quality content to it.
You can publish in any category like News, Micro-Niche, or Multi-Niche, but the contents should be original and authentic, which provides real value to your audience.
Human beings will review your AdSense application, so make sure your content quality is good enough to impress them.
Moreover, make your posts SEO-optimized to attract Search Traffic, which is more valuable for the AdSense website (the Rank Math SEO plugin will help you out there).
You may ask, “What do you mean by high-quality content?”
That’s why I’m sharing a few tips for writing content for an AdSense site.
#1. Your contents are free from spelling and grammatical mistakes. Use the Grammarly Chrome extension (For English) if you’re not confident about your copy.
#2. Add at least 1000 words to each post you publish.
Although it’s not a requirement for getting Google AdSense approval, your application may get rejected for publishing thin content.
So it’s better to play safe instead of facing rejection.
Ads will be displayed more often on long-form content resulting in higher ad impressions and revenue. If the content is worth reading, then it’ll help you in improving the user’s on-page duration.
#3. Add rich media like images, videos, and animation to enhance the visual appeal of your site, but at the same time make sure you are not compromising on the site’s loading time.
Check it with some tools available online, including GTmetrix, PageSpeed Insights, and Pingdom.
#4. Avoid plagiarism (copy-pasted content) at any cost. Plus, scrapped content and auto blogging are also treated as a severe violation of the AdSense guidelines.
To maintain a healthy balance between the user, publisher, and advertisers’ experience and protect the Google Advertising eco-system, Google AdSense only approves the sites having unique, original, and relevant content.
#5. Make the content more readable and user-friendly. Adding headings, subheadings, and styling will improve user experience to a greater extent.
#6. You can’t neglect the importance of SEO for an AdSense website. I have already discussed the importance of keyword research, but you should learn and implement other SEO techniques (on-page as well as off-page).
#7. Your content should be useful to your readers to solve their problems. It’ll help you to retain them for maximum time and patrons of your blog.
#8. Publish around 30 high-quality articles by following the above tips, which also shows you are consistent and serious about your business.
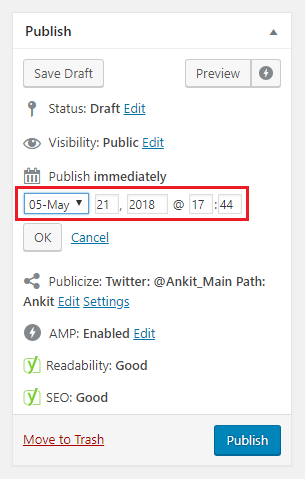
Pro tip: Add some back-dated articles for at least a couple of months (you can do that from the WordPress editor itself), so it’ll look like your website is online for the last many days and not newly created.
#9. Don’t publish articles on topics that are not allowed in the AdSense network including Porn, Gambling, Drugs, hacking, and cracking.
Here you can see the prohibited content policy of Google AdSense.
#10. Check whether you are writing content in the Language accepted by Google AdSense. You can see the list of languages here.
14. Creating Social Handles on Your Website
You may have your Twitter handle and Facebook fan page, but now it’s time to create a dedicated FB fan page, Twitter Handle, Instagram account, and Pinterest Boards for your accounts.
These are major social media channels and have millions of potential audiences for your AdSense website apart from SEO.
Make sure every channel has a professional profile photo and custom cover matching the identity of your website.
Keep these accounts active and update them frequently. Plus, try to get some followers and engagement to your content.
Pro tip: Every Social Media channel lets you add your website link to it, and you should be doing it with priority.
Although the links you will get will be nofollow, still they are useful because the particular social channels have massive domain authority and traffic potential.
15. Creating & Submitting XML Sitemap
Your AdSense website is ready, but search engine spiders (bots) need to crawl it to index and rank in SERP.
The best option for that is adding your website to Search consoles of Google and other search engines.
Go to Google Search Console >> Add A Property.

Verify your web property by adding a small code (Meta Tag) in your website’s header area.
To perform this activity, Copy the Meta Tag and sign in to your WP-Admin panel.
Go to Appearance >> Editor >> Select Header.php in right sidebar and insert the code right between <head> and </head> tag. (You can use CTRL + F to find the exact code snippet).
Save the changes and Verify your website in the Search Console.
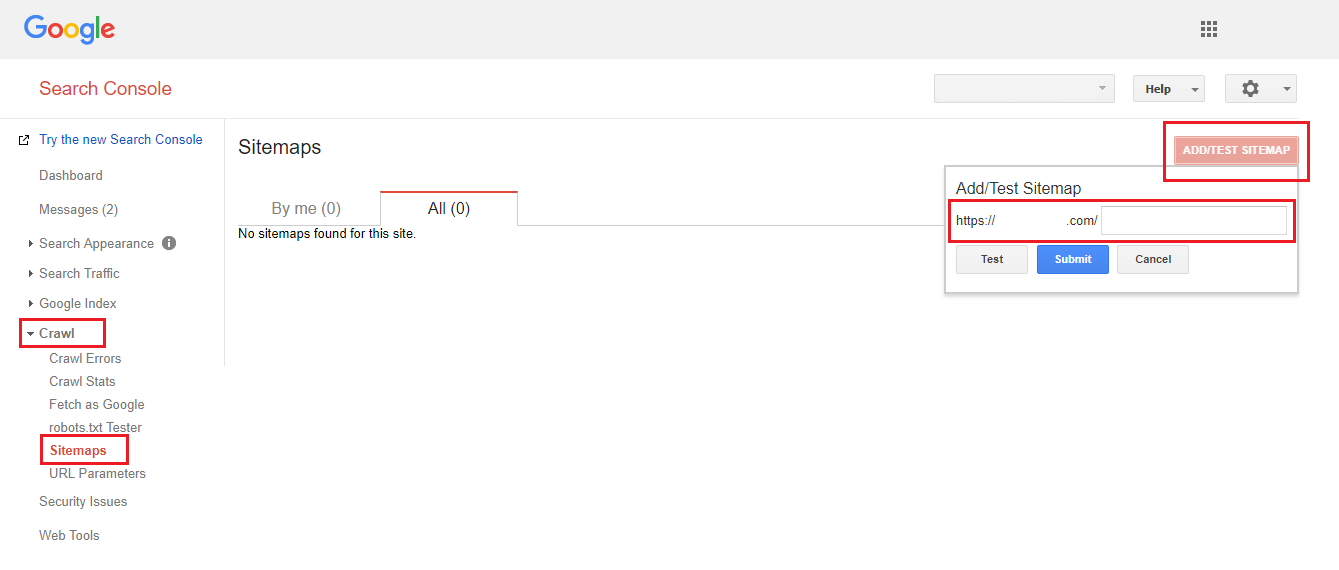
Once verified, add a sitemap to the Search Console to ask search engine bots to crawl your website.
You can use some third-party websites or add Google XML Sitemap WordPress plugins to your site. Get a sitemap and add it to Search Console by following the path Home >> Select Property >>Crawl >> Sitemap >> Add Sitemap.
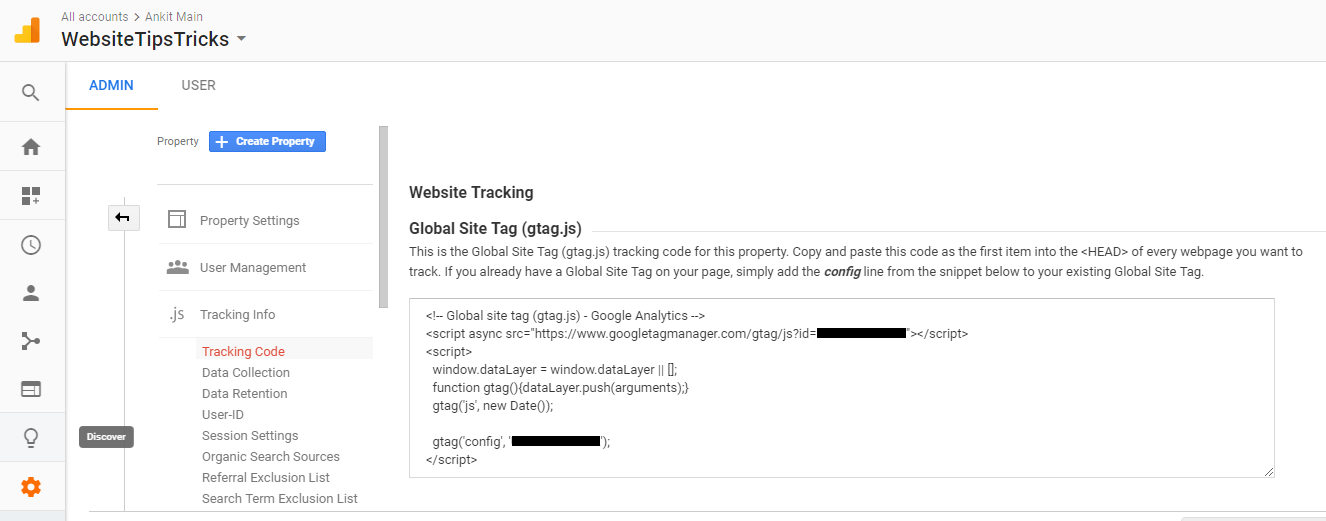
16. Integrating Google Analytics
Google Analytics is a fantastic service by Google to find insights about your website traffic, including unique visitors, page views, bounce rate, user behavior, and demographics.
To integrate your website with Google Analytics, go to Google Analytics >> Add Property >> Tracking Info >> Tracking code and add it to the header area of your website.
Pro tip: MTS AdSense users can directly add both Google Search Console Verification Meta Tag and Google Analytics tracking code by Theme Options itself.
Here is the path: WP Admin Panel > Theme Options > General Settings > Header Code > Insert Code Snippet and Save Changes at the bottom of the page.
Remember, website verification for Webmaster Tools (Search Console) is possible through the Google Analytics method.
17. Executing SEO Strategies
I know, you may have a content-ready website, but SEO is an ongoing process. That’s why you should do the following SEO activities regularly.
#1. Keyword Research
#2. On-Page SEO activities including image optimization & keyword optimization
#3. Rank Tracking
#4. Competitors’ Analysis (Use SEMrush)
#5. Off-Page SEO including Link Building, Social Bookmarking, Infographics & PDF submission.
18. Getting Initial Traffic
Even before applying for Google AdSense approval, make sure you have at least daily traffic of 100 unique visitors.
Google Advertising is pure business, and it totally depends on the quality of traffic.
On the opposite side, you also earn nothing if you don’t have a constant stream of unique visitors.
Because the average earnings for low-traffic Google AdSense websites are quite limited.
“Then, How can I get massive traffic for my AdSense website?” This is the obvious question you might ask me.
So here are a few traffic-building tips.
#1. Focus on SEO and high-quality link building. It may take time to show your website on the top of SERP but ultimately what every blogger wants. Don’t be spammy to create low-quality backlinks.
#2. Join some niche-related Facebook groups, forums, and, communities. Try to engage with people, offer them help, and post only high-quality, relevant content daily.
#3. Learn about Pinterest traffic building. Apparently, the new player in the Social media game but giving thousands of targeted traffic from all over the world. Make sure you have a Rich Pins-enabled Pinterest Business account with at least five boards in different categories.
#4. If you are an expert in the niche you have selected for your website, then join some Q&A websites like Quora and answer at least 3-5 questions daily.
Getting high-quality traffic is not easy; otherwise, everyone would be a blogger or internet marketer. So follow these tips, create a spreadsheet to track your progress, and share your experience after a couple of months.
#5. If you have purchased the Thrive Leads Plugin on my recommendation, then integrate it with GetResponse and build your email list by offering some goodies to your readers in exchange for their Names and Email Addresses.
19. Applying For Google AdSense
Only if you are following all the above steps and getting decent traffic (though it’s not an official requirement for getting Google AdSense approval), go to the AdSense website and apply for a brand new account.
Add your website URL, and email address, and choose whether you want to receive the communication from Google AdSense or not.
On the next page, you can change your info or select your Country to continue. At the bottom, you need to accept the Terms of Google AdSense to create an account.
In the next few days, the Google AdSense team will manually review your website for compliance with their standard guidelines and tell whether your application is approved or not.
If you are following all the above steps, then most probably you will get Google AdSense approval on the first attempt.
Important: If you already have an approved AdSense account, don’t apply again. Some people claim to have multiple Google AdSense accounts, but they are created using some illegal tricks, and you should not believe in such people or follow their route.
Because having multiple accounts for an individual is against AdSense guidelines and if Google detects someone doing that, the AdSense account may get banned, and revenue generated by that account will be forfeited.
20. Increasing Website Traffic
Getting Adsense approval is only half of the game; you need consistent, high-quality traffic (at least 100K/month) to make significant revenue from AdSense.
So, try to add more SEO-optimized content and promote them on various platforms.
Here are a few tips to improve your website traffic
1. Be consistent with content publishing so people will visit your blog regularly.
2. Find low-competition keywords having high search volume and good CPC. Try to rank on the top for these keywords using the right strategies of On-page and Off-page SEO.
If you don’t know how to do that search online, learn through some courses, or hire a VA/freelancer to work on your behalf. Make sure you are hiring the right person.
3. Use social media as a priority channel for promotion.
4. Build an email list to bring the targeted traffic which you can monetize using affiliate marketing or direct selling the products in combination with Google AdSense.
5. Follow the 80:20 rule of content marketing.
21. Important Tips
When you’re creating an AdSense website and following the standard procedure from writing content to getting revenue, you should always remember a few tips as mentioned below.
1. No Self-clicking/group clicking (A major reason to get an AdSense account ban)
2. Check content niche/language
3. Avoid Plagiarism
4. Remove ads from other ad networks while applying for AdSense and don’t add them until you get a fully approved AdSense account.
5. Don’t deal with buying/selling accounts.
6. No second Google AdSense account, unless the first one is closed and you have notified the AdSense team about it.
7. Comply with Google Adsense program policies and content guidelines.
You May Also Like
![What Is PLR Digital Products and How to Make Money With Them [Beginner's Guide]](https://successpixel.com/wp-content/uploads/2026/06/What-Is-PLR-Digital-Products-and-How-to-Make-Money-With-Them-Beginners-Guide.jpg)