How to Improve Core Web Vitals and Google Page Experience Score

You’re probably searching for the easiest way to improve core web vitals and achieve a good page experience score in the Google search console.
Right?
Many people ask me how to improve core web vitals and fix the “Your site has no URLs with a good page experience” error.
Before answering these questions, let’s understand what Google page experience update is and what Google core web vitals (CWV) is.
Later, I will share a step-by-step tutorial to improve core web vitals and achieve a good page experience score for your WordPress site.
Google Page Experience Update
In May 2020, Google announced the inclusion of page experience signals in Google search rankings.
Later, in November 2020, Google shared a clear timeline for the page experience update.
Google also revealed that the new page experience signals combine Core Web Vitals (CWV) with its existing search signals, including mobile-friendliness, HTTPS security, safe-browsing, and intrusive interstitial guidelines.

Although the update was delayed from the projected date of May 2021, Google resolved the issues and started rolling it out from mid-June 2021.
The page experience update is currently being rolled out globally and will be complete by the end of August 2021.
Google Page Experience Signals
Here is a quick overview of Google page experience signals.
Core Web Vitals
These signals are the key indicators to determine whether your page provides a good user experience or not by evaluating the loading performance, interactivity, and visual stability.
Google measures Largest Contentful Paint (LCP), First Input Delay (FID), and Cumulative Layout Shift (CLS) and displays them under the Core Web Vitals report.
We’ll discuss core web vitals and how to improve core web vitals in the later section.
Mobile Friendly
Mobile traffic has surpassed desktop traffic, so your page should be mobile-friendly and easily accessible on any device.
A Mobile-Friendly testing tool from Google provides instant feedback on your site’s mobile-friendliness.
Safe Browsing
Only a page that does not contain any malicious or deceptive content will pass this test.
Safe Browsing alerts users when it detects a potentially harmful site.
The purpose of these warnings is to prevent users from visiting harmful sites and keep them safe online.
Safe Browsing technology contributes to protecting your online browsing activities, but you should still be concerned if your site exhibits any Safe-browsing errors.
Because these errors might prevent potential customers from reaching your site, resulting in revenue losses.
HTTPS
HTTPS stands for Hypertext Transfer Protocol Secure.
It ensures that the communication between the user’s computer and the site is encrypted.
Google recommends you deploy HTTPS to secure users’ connections to your site, regardless of the content on the site.
No Intrusive Interstitials
Your website content should be easily accessible to ensure the best user experience.
A page displaying popups covering the main content or containing intrusive interstitials offers an unpleasant user experience than other pages that immediately display content.
On mobile devices, which often have smaller screens, it can be problematic.
The pages that are not easily accessible to mobile search users on the transition from mobile search results may not rank as highly after January 10, 2017.
The above information gives you some basic knowledge about the Google page experience update and the factors influencing page experience score.
Let’s now take a look at all page experience signals in detail. Besides, we’ll cover the most common page experience errors and how to fix them.
Core Web Vitals
CWV is a critical element of the page experience. By optimizing your core web vitals score, you might be able to increase your search traffic and conversions.
However, many people struggle to achieve a good core web vitals score. It may be even harder for non-techies to understand Google Core Web Vitals.
Therefore, I have attempted to explain what core web vitals is and how to improve core web vitals for your WordPress site.
Google launched Core Web Vitals to measure and improve the web user experience.
Core Web Vitals looks at how your WordPress site’s performance contributes to its ability to deliver a high-quality user experience instead of focusing on generic metrics like the fully loaded time.
Users are often concerned with how quickly they can start interacting with a page.
That is exactly what Core Web Vitals is designed to measure.
Currently, the Core Web Vitals includes three metrics:
- Largest Contentful Paint (Page Loading Performance)
- First Input Delay (Interactivity)
- Cumulative Layout Shift (Visual Stability)

Google considers these metrics to be the key indicators in determining a great user experience.
In the next section, we’ll take a closer look at each CWV metric.
Largest Contentful Paint (LCP)
Largest Contentful Paint (LCP) is a critical user-centric metric that helps understand perceived page load time.
It indicates the point in the page loading timeline when the page’s main content has likely been loaded.
In other words, Largest Contentful Paint refers to the first render time of the largest content (e.g., image or text block) within the viewport, compared to the moment the page first started loading.
What is a good LCP score?
For the best user experience, sites should have the Largest Contentful Paint (LCP) of 2.5 seconds or less.

- Good: Less than or equal to 2.5 seconds
- Needs Improvement: Between 2.5 seconds and 4.0 seconds
- Poor: Over 4 seconds.
First Input Delay (FID)
FID refers to the time between the user’s first interaction with a page e (e.g., clicks a button or a link) and the moment when the browser can actually start processing event handlers as a result of that interaction.
What is a good FID score?
FID is a measure of page load responsiveness, and a good FID score ensures that the page is usable.
Sites should aim for a First Input Delay of 100 milliseconds or less to provide a smooth user experience.

- Good: Less than or equal to 100 ms
- Needs Improvement: Between 100 ms and 300 ms
- Poor: Over 300 ms
Cumulative Layout Shift (CLS)
Cumulative Layout Shift (CLS) score analyzes the visual stability and quantifies how often users encounter unexpected layout shifts.
Layout shifts occur whenever a visible element changes its position between rendered frames.
What is a good CLS score?
Sites should aim for a CLS score of 0.1 or less to provide a good user experience.

- Good: Less than or equal to 0.1
- Needs Improvement: Between 0.1 and 0.25
- Poor: Over 0.25
How to Measure Core Web Vitals?
You can utilize the following tools to test, measure, and report Core Web Vitals.
- Google PageSpeed Insights
- Google Search Console
- Web.dev Measure
- Web Vitals Google Chrome Extension
- WebPageTest
- GTmetrix
Let’s take a look at each tool.
1. Google PageSpeed Insights
Google PageSpeed Insights is a popular tool for checking the speed performance of individual web pages.
In addition, you can use it to measure your Core Web Vitals.
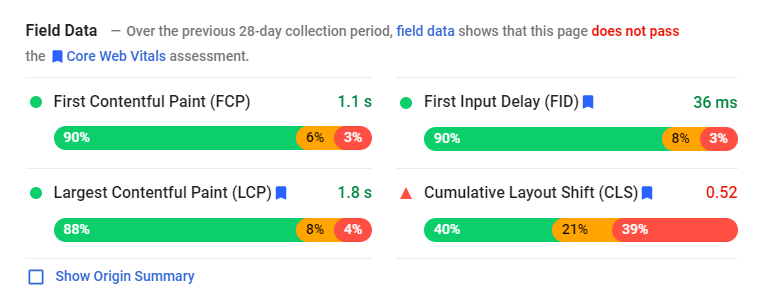
The tool provides you with a comprehensive Core Web Vitals report that includes both field and lab data and key CWV metrics, i.e., Largest Contentful Paint (LCP), First Input Delay (FID), and Cumulative Layout Shift (CLS).
Enter your URL in the GPSI input field and click Analyze to evaluate its performance.

You’ll find the Core Web Vitals assessment report under the Field Data section.
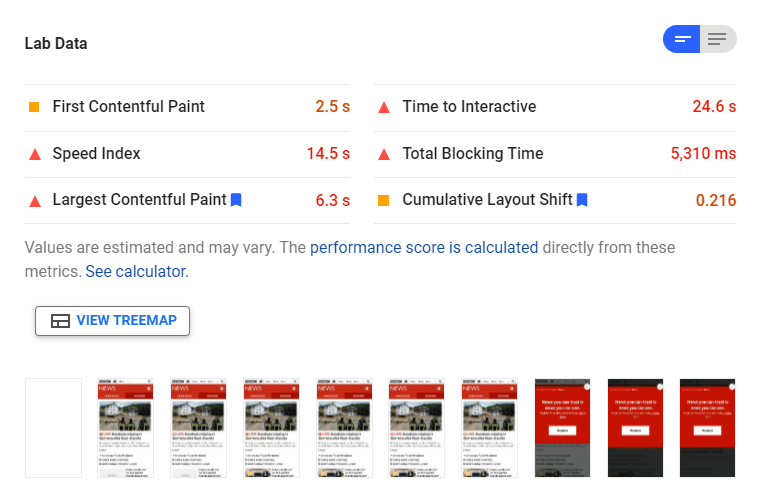
If the field data isn’t available for a particular URL, you can check the Lab Data section to get an idea of your page’s performance.
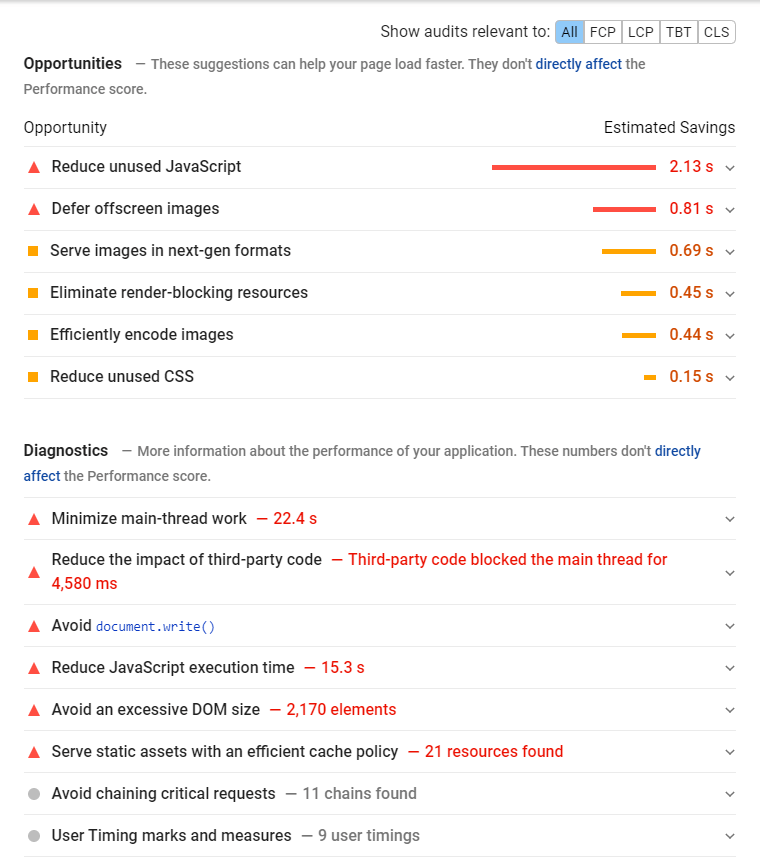
The best thing about Google PageSpeed Insights is that it provides complete diagnostics and opportunities to improve Core Web Vitals score and overall website speed performance.
Please note that the Field Data report provides historical performance data for a URL and represents anonymous performance data collected from real-world users using various devices and network conditions.
The Lab Data report is based on a simulated page load on a single device with fixed network conditions.
In some cases, this may lead to differences in report values.
2. Google Search Console
Next, we’ll look at Google Search Console, an awesome tool for measuring your Core Web Vitals.
The Core Web Vitals report is available in the Google Search Console for all verified domains.
To access it, simply navigate to Page Experience > Page Experience Signals > Core Web Vitals, or click directly on the Core Web Vitals option on the left sidebar.

Google Search Console provides detailed information on Core Web Vitals, affected URLs, and their progress over time.
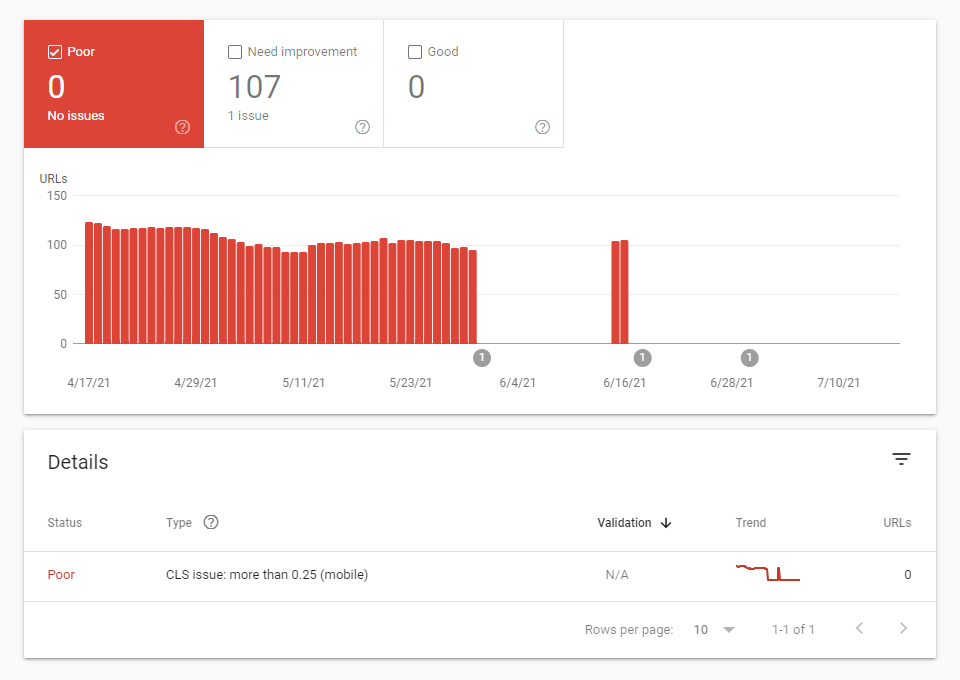
The main benefit of using Google Search Console for the Core Web Vitals test is that it groups the web pages (URLs) affected by a similar issue. E.g., CLS issue: more than 0.1 (mobile) or LCP issue: longer than 2.5s (mobile).
In comparison with Google PageSpeed Insights, Google Search Console makes it possible to measure CWV metrics across your entire site instead of analyzing individual pages.
Important: The Core Web Vitals data in Google Search Console comes from the Chrome User Experience (CrUX) Report.
These statistics reflect the real-world usage data on your site by users around the world.
3. Web.dev Measure
The tool measures your website’s performance and provides tips on how to improve it.
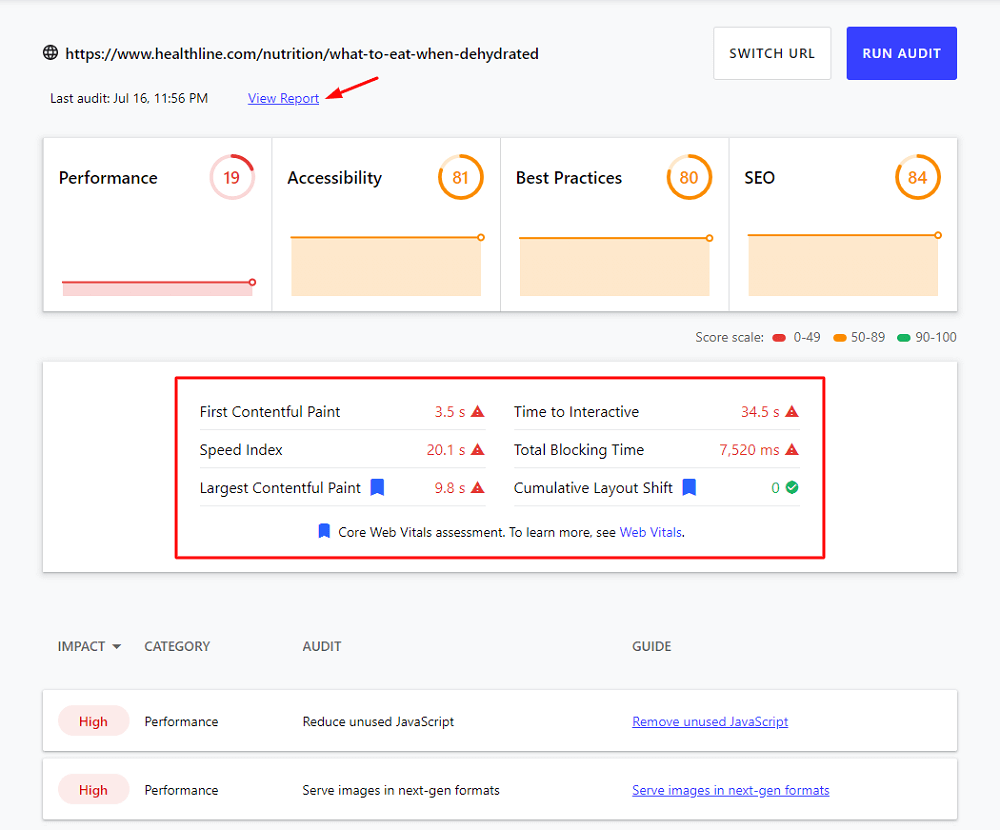
By clicking the View Report link, you can gain detailed insights into your website’s performance, SEO, accessibility, and best practice.
The report is no less than a mini technical audit conducted at the Lighthouse.
However, this method is more appropriate for measuring LCP and CLS.
As this tool simulates a test environment without real user input, it cannot provide FID measurements.
Instead, it measures a similar metric known as Total Blocking Time (TBT).
4. Web Vitals Google Chrome Extension
The Web Vitals Google Chrome extension allows you to check Core Web Vitals score for any URL on the fly.
This extension measures and provides real-time analysis of loading (LCP), interactivity (FID), and layout shift (CLS) metrics.
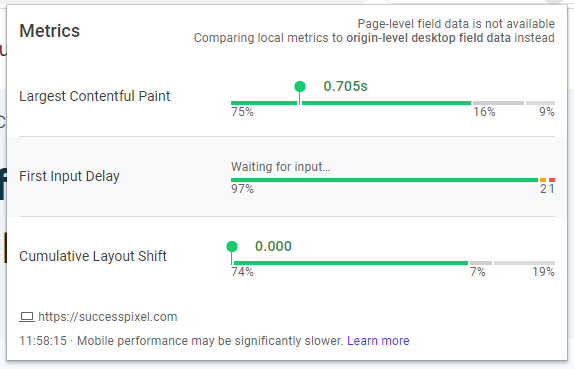
It is consistent with the CrUX report and CWV data measured and reported to other Google tools. E.g., Google PageSpeed Insights or Google Search Console.
The following badge color represents the URL’s Core Web Vitals status on the Web Vitals Google Chrome extension:
- Gray: Disabled
- Green: Passing CWV
- Red: One or More CWV metrics failing
After installing the extension, a disabled state badge will appear until you visit a URL.
The badge will turn green or red depending on whether the URL passes the Core Web Vitals metrics thresholds.
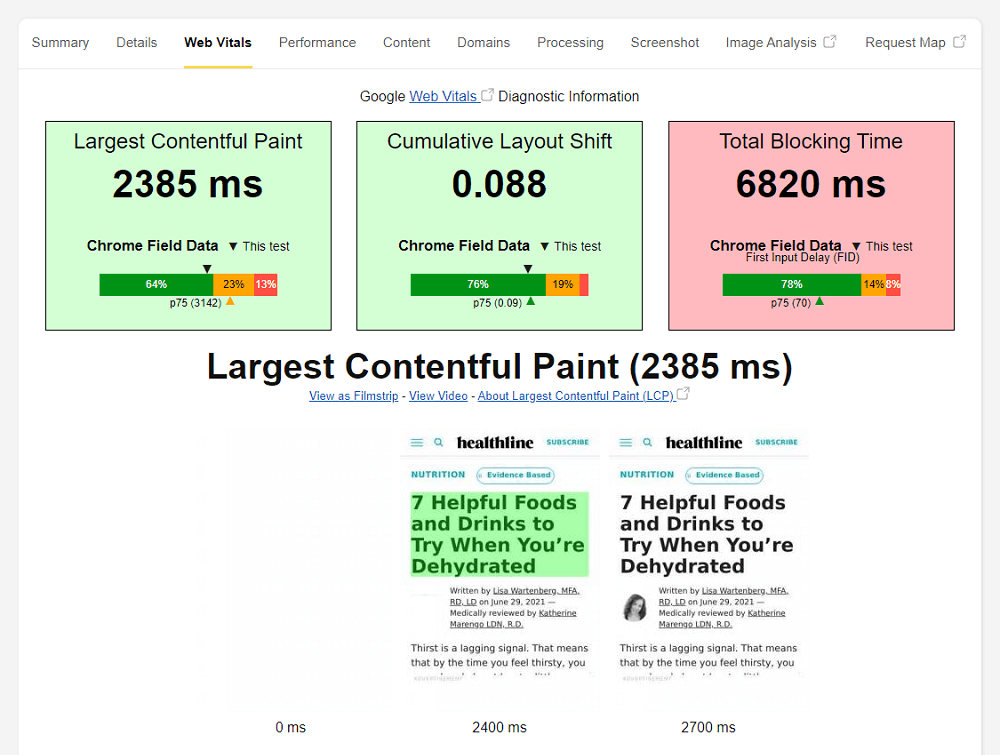
5. WebPageTest
WebPageTest is another tool for measuring your Web Vitals.
It provides reports on various aspects of your WordPress site, including the Core Web Vitals.
To use this tool, select the Web Vitals option on the WebPageTest homepage, enter your URL, choose Core Web Vitals test configuration, and click the Start Test button.

It will generate detailed reports on all Core Web Vitals metrics and display all factors affecting your web page’s performance.
6. GTmetrix
Last on our list of tools to measure Web Vitals is GTmetrix.
In addition to Website Speed Score and Core Web Vitals, the platform offers reports on different aspects of your WordPress website.
Please note that GTmetrix uses Lighthouse Performance data to generate its reports.
You can visit the Performance tab to get detailed insights into your website’s Web Vitals report.
By fixing the errors (Top Issues) found under the Summary tab, you will experience a significant increase in page speed performance.

How to Improve Core Web Vitals in WordPress
I’m sure that you understand what Core Web Vitals is, the importance of Core Web Vitals, and how to measure the metrics.
Now, it’s time to learn how to improve Core Web Vitals, particularly for your WordPress site.
I have broken down this tutorial into three parts:
- How to Improve Largest Contentful Paint (LCP)
- How to Improve First Input Delay (FID)
- How to Improve Cumulative Layout Shift (CLS)
TL;DR:
Not enough time to read it all?
The following are seven easy ways to improve your Core Web Vitals and overall page experience.
- Choose high-quality web hosting, preferably with Cloudflare Railgun integration. E.g., Rocket.net, ChemiCloud WordPress Turbo
- Use a lightweight, mobile responsive WordPress theme that helps fix some CWV issues and achieve mobile-friendly status. E.g., GeneratePress, Astra, Kadence
- Compress and convert your images to WebP. Use TinyPNG for image compression and Flying Images WordPress plugin for converting your images to WebP on all supported browsers.
- Install WP Rocket WordPress plugin and apply recommended settings.
- Enable HTTPS on your WordPress sites. Nowadays, most web hosts provide free Let’s Encrypt SSL certificates, including those mentioned in point #1.
- Never use nulled themes or plugins that impose security risks. Ensure that your site is protected from all known and unknown security threats as well. You can use Sucuri or any similar website protection suite.
- Don’t enable intrusive interstitials or popups on the mobile loading screens, especially for organic visits.
How to Improve Largest Contentful Paint (LCP)?
Slow loading content increases the chances of users leaving your site.
If your LCP score is above 2.5 seconds, you should take steps to improve it.
Obviously, the solution you choose will differ depending on the reason for your poor score.
However, the most common reasons include slow servers, render-blocking JavaScript and CSS, and unoptimized images.
I have shared a few quick tips to improve your LCP score.
1. Set up Page Caching.
The page caching process accelerates how quickly your server can respond and reduces server response times (TTFB), especially for repeat visitors.
Use any good WordPress caching plugin of your choice.
Here are my top picks:
- WP Rocket (Recommended)
- FlyingPress
- Swift Performance
2. Optimize Browser Caching.
Make sure that browsers cache static files.
As a result, you will meet the “Serve static assets with an efficient cache policy” Google PageSpeed Insights recommendation.
3. Optimize Your Images.
The LCP element is often an image.
When you optimize images, you will improve your site’s speed and adhere to several PageSpeed recommendations, including “Properly size images,” “Defer offscreen images,” “Serve images in next-gen formats,” and “Efficiently encode images.”
The best approach to deal with this issue is to find the right image sizes based on your website’s layout, uploading optimized and compressed images and serving them into the WebP or any next-gen format.
Several plugins, including ShortPixel, Imagify, WebP Converter, can help you address the above issues.
However, my favorite image optimization plugin is Flying Images by WP Speed Matters.
This free plugin offers lazy loading, WebP conversion on the fly, and free CDN for images.
4. Optimize Your Code.
Loading unnecessary JavaScript or CSS files before the main content will slow down the page’s load time.
Eliminate render-blocking resources on your WordPress site to fix this problem.
Additionally, you should minify CSS and Javascript files and remove unused CSS when possible.
You can address the “Avoid chaining critical requests” Google PageSpeed Insight’s recommendation by optimizing your code.
5. Preload or Pre-connect Important Third-party Resources.
With Preconnect, you can establish important third-party connections early and meet the “Preload key requests” and “Preconnect to required origins” PageSpeed recommendations.
6. Use Server-level Compression.
Reduce your site’s file size by using Gzip or Brotli compression, which speeds up LCP.
Most WordPress caching plugins offer an option to enable Gzip compression.
However, you can use Rocket.net to leverage Brotli compression, which is slightly more effective than Gzip.
Cloudflare users (both free and paid) can enable this option by logging into their accounts.
7. Use a Content Delivery Network (CDN).
The CDN enables you to deliver your content from a data center nearer to your visitors.
Using a CDN can speed up your LCP for a global audience.
Nowadays, most WordPress hosting service providers offer free CDN.
Else you can use Cloudflare or BunnyCDN; both are cost-effective CDN solutions.
How to Improve First Input Delay (FID) on WordPress
An ideal FID time is 100 milliseconds or less. The UX of your site may suffer if it takes longer than that.
FID optimization is the most challenging among all Core Web Vitals, especially when you are not a developer since it relies entirely on code.
The best way to improve your FID score is to optimize JavaScript.
Either eliminate unnecessary JavaScript or at least limit the execution of heavy JavaScript if it is possible.
Other methods such as server-level compression, browser caching, preload/pre-connect important resources can also help you improve your FID score.
Following these steps will enable you to meet PageSpeed recommendations such as “Reduce javascript execution time,” “Remove unused JavaScript,” and “Minimize main thread work.”
How to Improve Cumulative Layout Shift (CLS)
CLS measures visual stability and reflects how elements on a page shift as the page loads.
Unexpected layout shifts may cause a user to click on the wrong element, resulting in a frustrating user experience.
Ideally, CLS should not exceed 0.1. However, if it does, you should take the necessary actions to improve your CLS.
Below are a few quick tips on how to improve CLS for your WordPress site.
1. Fix Images Without Dimensions
CLS scores increase if you don’t set the width and height attributes for your images.
The same applies to all media, including GIFs, videos, and infographics.
WordPress automatically adds dimensions to images you add via the editor.
You should, however, specify the dimensions when adding images manually using code.
WP Rocket WordPress plugin has a feature to add missing image dimensions.
These steps cover the best practices about serving scaled images.
2. Fix ads, Embeds, and iFrames Without Dimensions
Publishers and advertising networks often support dynamic ad sizes.
Although increasing ad sizes will increase advertising revenue/performance, it can cause a less desirable user experience since it will push visible content down the page.
Ads are a major contributor to layout changes on the page. However, sites can follow best practices to reduce ad shifts, as mentioned below.
- Reserve space for the ad slot.
- Avoid placing non-sticky ads at the top of the viewport.
- Reserve the largest possible size for the ad slots. This method eliminates layout shifts but leaves a blank space if a smaller ad creative fills the space.
- If the ad slot is visible but no ad returns, display a placeholder instead of collapsing the reserved space.
- Analyze historical data to determine the most likely size for the ad slot.
In the same way as images, embeds without dimensions can also cause CLS issues.
Whenever you use these embeds, always specify the sizes.
3. Avoid Dynamic Content Insertion
Unless the user interacts, do not insert new content above existing content.
Here are a few examples of dynamic content that leads to layout shifts.
- Newsletter form
- Related content
- iOS/Android app installation banner
- Product display banners
- Deal popups
- GDPR notice
Whenever you wish to use one of them, make sure that there is sufficient space reserved in the viewport.
It’ll help you minimize the unexpected layout shifts.
4. Optimize Web Fonts Causing FOIT/FOUT
Dealy in downloading and rendering of web fonts can cause layout shifts in two ways:
- FOIT: Flash of Invisible Text
- FOUT: Flash of Unstyled Text
As a result, you may receive: “Ensure text remains visible during webfont load” error in Google PageSpeed Insights.
Web font preloading is one way to fix this issue.
Summary
Maintaining a positive user experience is crucial if you want your WordPress site to be successful.
UX significantly influences your conversions, and after a complete rollout of the Google Page Experience update, it will greatly impact your SEO results.
Therefore, you should optimize your WordPress site to comply with Google Core Web Vitals and other page experience signals.
This article mentions resources to help you identify and fix Core Web Vitals and other Page Experience errors before they negatively affect your search engine rankings.
Taking the right actions will surely help you get a higher PageSpeed score and ranking boost.


